Enable epel-release on RHEL 10.0
sudo dnf update -y
sudo subscription-manager repos --enable codeready-builder-for-rhel-10-x86_64-rpms
sudo dnf install https://dl.fedoraproject.org/pub/epel/epel-release-latest-10.noarch.rpm
sudo dnf update -y
sudo subscription-manager repos --enable codeready-builder-for-rhel-10-x86_64-rpms
sudo dnf install https://dl.fedoraproject.org/pub/epel/epel-release-latest-10.noarch.rpm
PS C:\> aws ec2-instance-connect ssh --instance-id i-0aa38de21acf2aa1c --region ap-south-1
Bad permissions. Try removing permissions for user: \\OWNER RIGHTS (S-1-3-4) on file C:/Users/hikari/AppData/Local/Temp/tmpm9m1bf7j/private-key.
@@@@@@@@@@@@@@@@@@@@@@@@@@@@@@@@@@@@@@@@@@@@@@@@@@@@@@@@@@@
@         WARNING: UNPROTECTED PRIVATE KEY FILE!          @
@@@@@@@@@@@@@@@@@@@@@@@@@@@@@@@@@@@@@@@@@@@@@@@@@@@@@@@@@@@
Permissions for 'C:\\Users\\hikari\\AppData\\Local\\Temp\\tmpm9m1bf7j\\private-key' are too open.
It is required that your private key files are NOT accessible by others.
This private key will be ignored.
Load key "C:\\Users\\hikari\\AppData\\Local\\Temp\\tmpm9m1bf7j\\private-key": bad permissions
[email protected]: Permission denied (publickey,gssapi-keyex,gssapi-with-mic).
Verification as of 2025/06/11.
PS C:\> wsl -- aws ec2-instance-connect ssh --instance-id i-0aa38de21acf2aa1c --region ap-south-1
  ,     #_
  ~\_  ####_        Amazon Linux 2023
  ~~  \_#####\
  ~~     \###|
  ~~       \#/ ___   https://aws.amazon.com/linux/amazon-linux-2023
  ~~       V~' '->
   ~~~         /
    ~~._.   _/
      _/ _/
     _/m/'
Last login: Tue Jun 10 22:50:33 2025 from 192.168.0.183
[ec2-user@ip-192-168-0-4 ~]$
Why?
Downgrading allowed connection.
I wish they would fix this.
Reference: https://github.com/aws/aws-cli/issues/9114
msiexec.exe /i https://awscli.amazonaws.com/AWSCLIV2-2.17.35.msi
EC2 Instance Connect is a service designed to simplify SSH connections to AWS EC2 instances.
With traditional SSH connection methods, a public key needed to be pre-configured on the instance. However, EC2 Instance Connect allows you to send a temporary SSH public key to the instance to establish a connection. (However, an Instance Connect package needs to be installed, except for some AMIs).
There are several ways to connect to an instance.
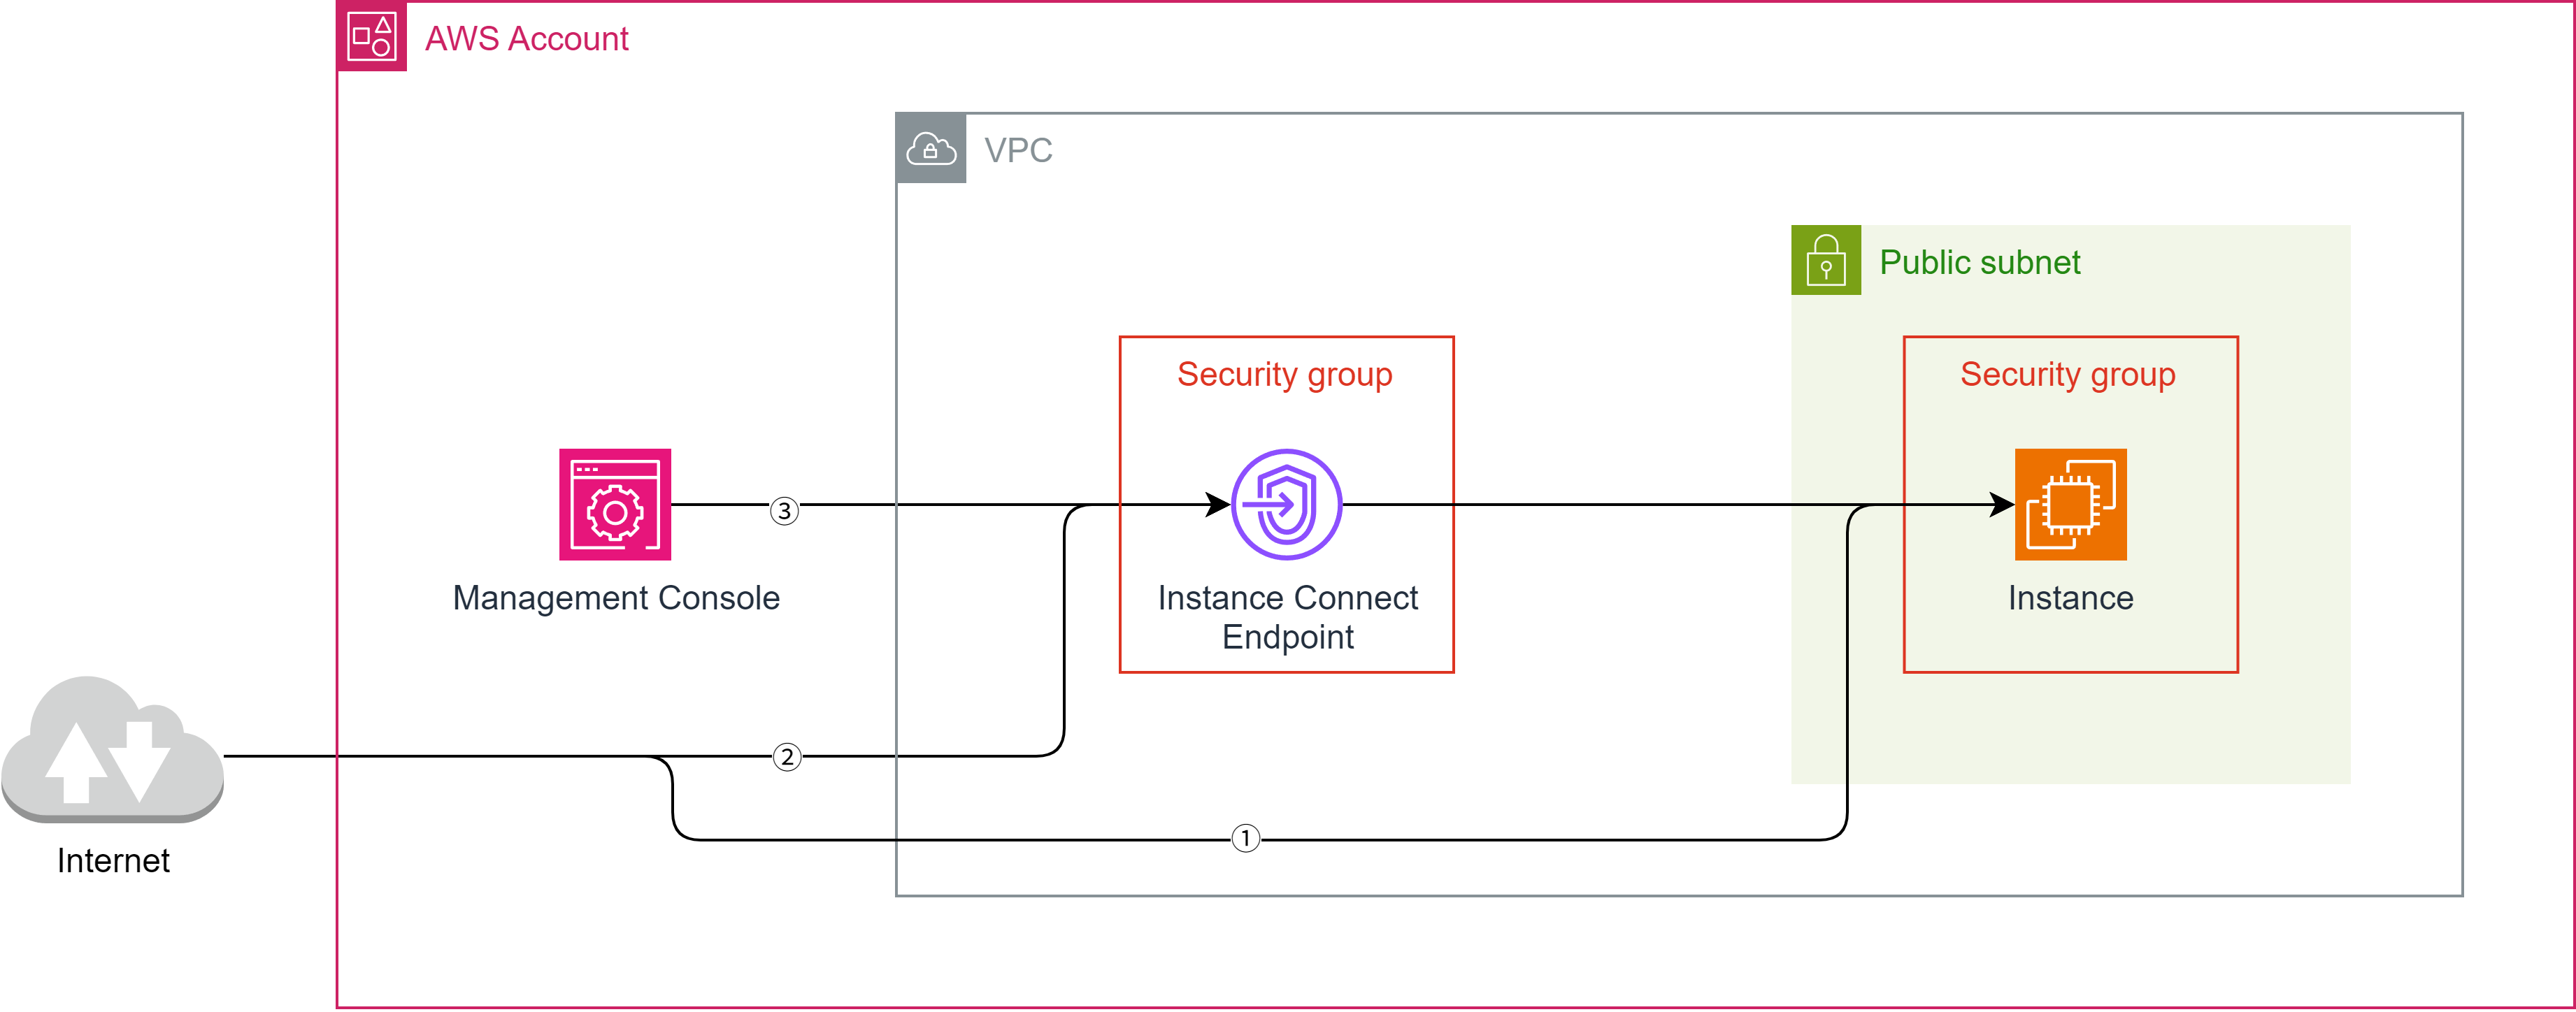
Direct connection from the internet requires passing through an Internet Gateway or a NAT Gateway. It also needs a public IP address and cannot be used in a private network environment.
Since the ssh command can be used, it's the simplest method.
ssh <username>@<public IP address>
By using the AWS CLI to connect via an EC2 Instance Connect endpoint, a public IP address is not required.
This also helps save on costs (a few hundred yen per month).
You can connect using a command like the following with the AWS CLI, but you must first import a key pair and configure it for the instance.
For example, a specific connection method is possible with the following command:
aws ec2-instance-connect ssh --private-key-file .ssh/id_ed25519 --os-user <username> --instance-id <instance ID> --connection-type eice
Note: You must first obtain an access key and configure it using aws configure.
This connection method is best if you want to avoid connecting to the internet and wish to use a non-official AMI.
For Amazon Linux and Ubuntu, if you have an Instance Connect endpoint created, you can connect to the instance directly from the Management Console.
However, an Instance Connect package needs to be installed, except for some AMIs.
For details, refer to: https://docs.aws.amazon.com/ja_jp/AWSEC2/latest/UserGuide/ec2-instance-connect-set-up.html
Two endpoints for Session Manager need to be set up, and an IAM role that allows connections from Session Manager must be attached to the instance.
Also, a Session Manager package needs to be installed, except for some AMIs.
Using the serial console allows direct connection to the instance. Be aware that if a password is not set, you won't even be able to log in.
By default, all traffic is allowed, so no specific configuration is needed if using the default settings.
The minimum required settings are as follows:
Inbound rules must allow SSH (port 22).
This allows communication to the instance's SSH server, which typically listens on port 22.
Outbound rules must allow custom TCP (ports 1024-65535).
1024-65535 is the port range used by the client side during an SSH connection.
Inbound rules must allow SSH (port 22).
This setting is absolutely necessary.
Security groups remember communication (stateful), so outbound rules are usually not required.
Not required due to statefulness.
SSH (port 22) must be allowed.
This allows communication to the instance's port 22.
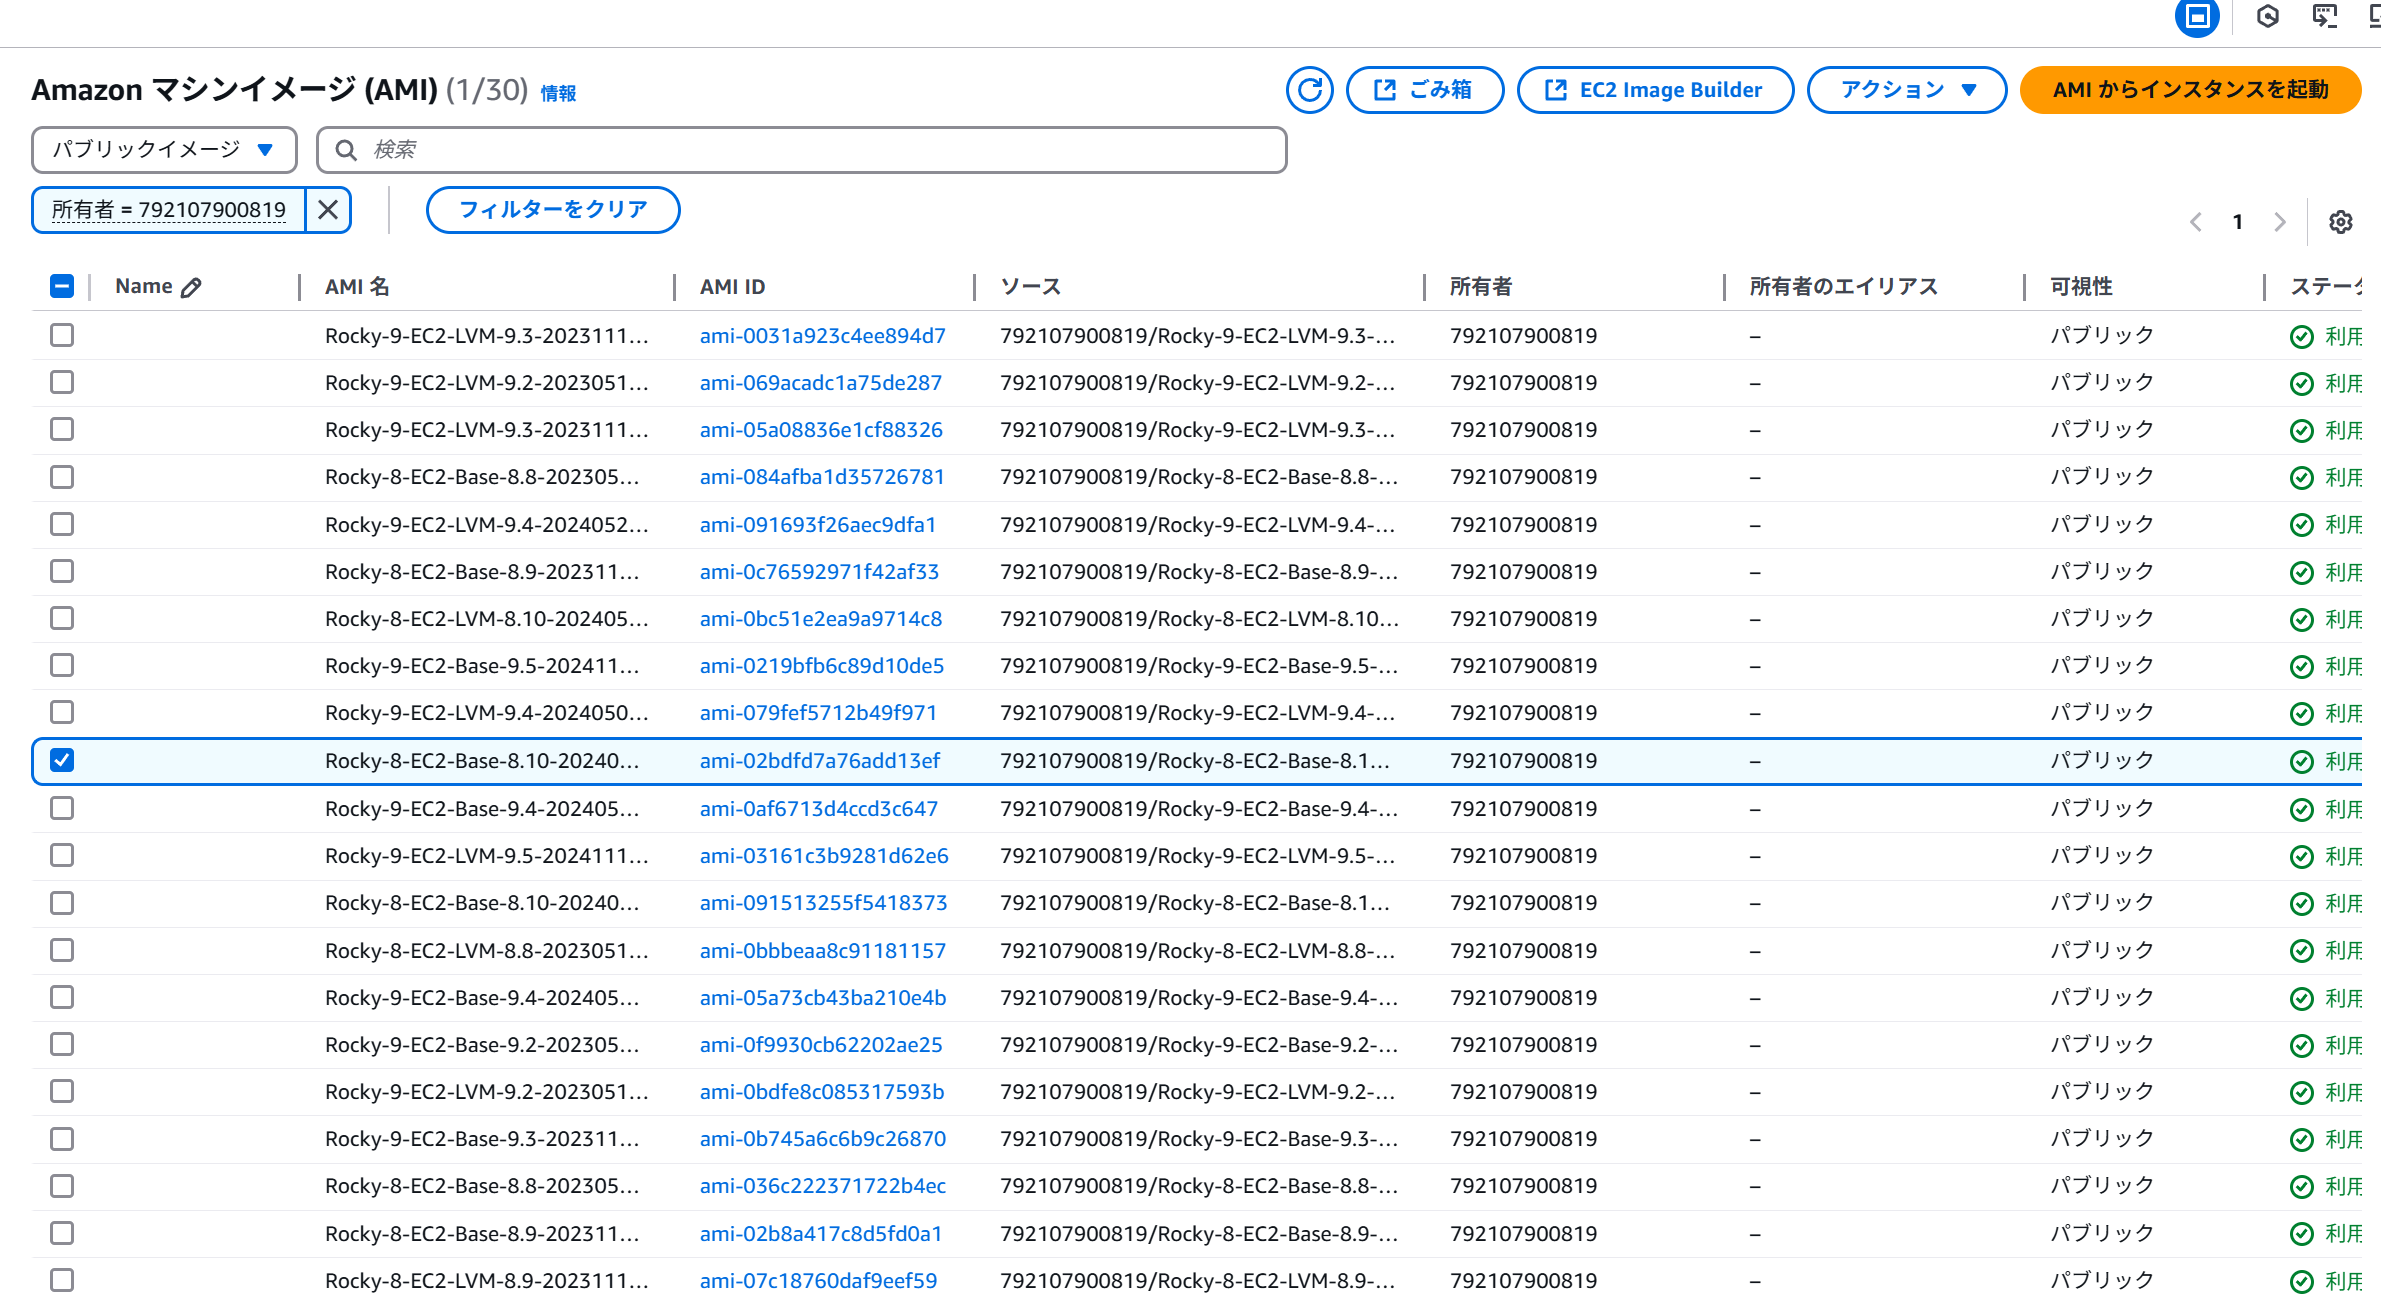
Obtain the AMI from the official page.
https://rockylinux.org/ja-JP/download
Select the architecture for your instance (ARM (aarch64)) and choose AWS AMI under Cloud Images.
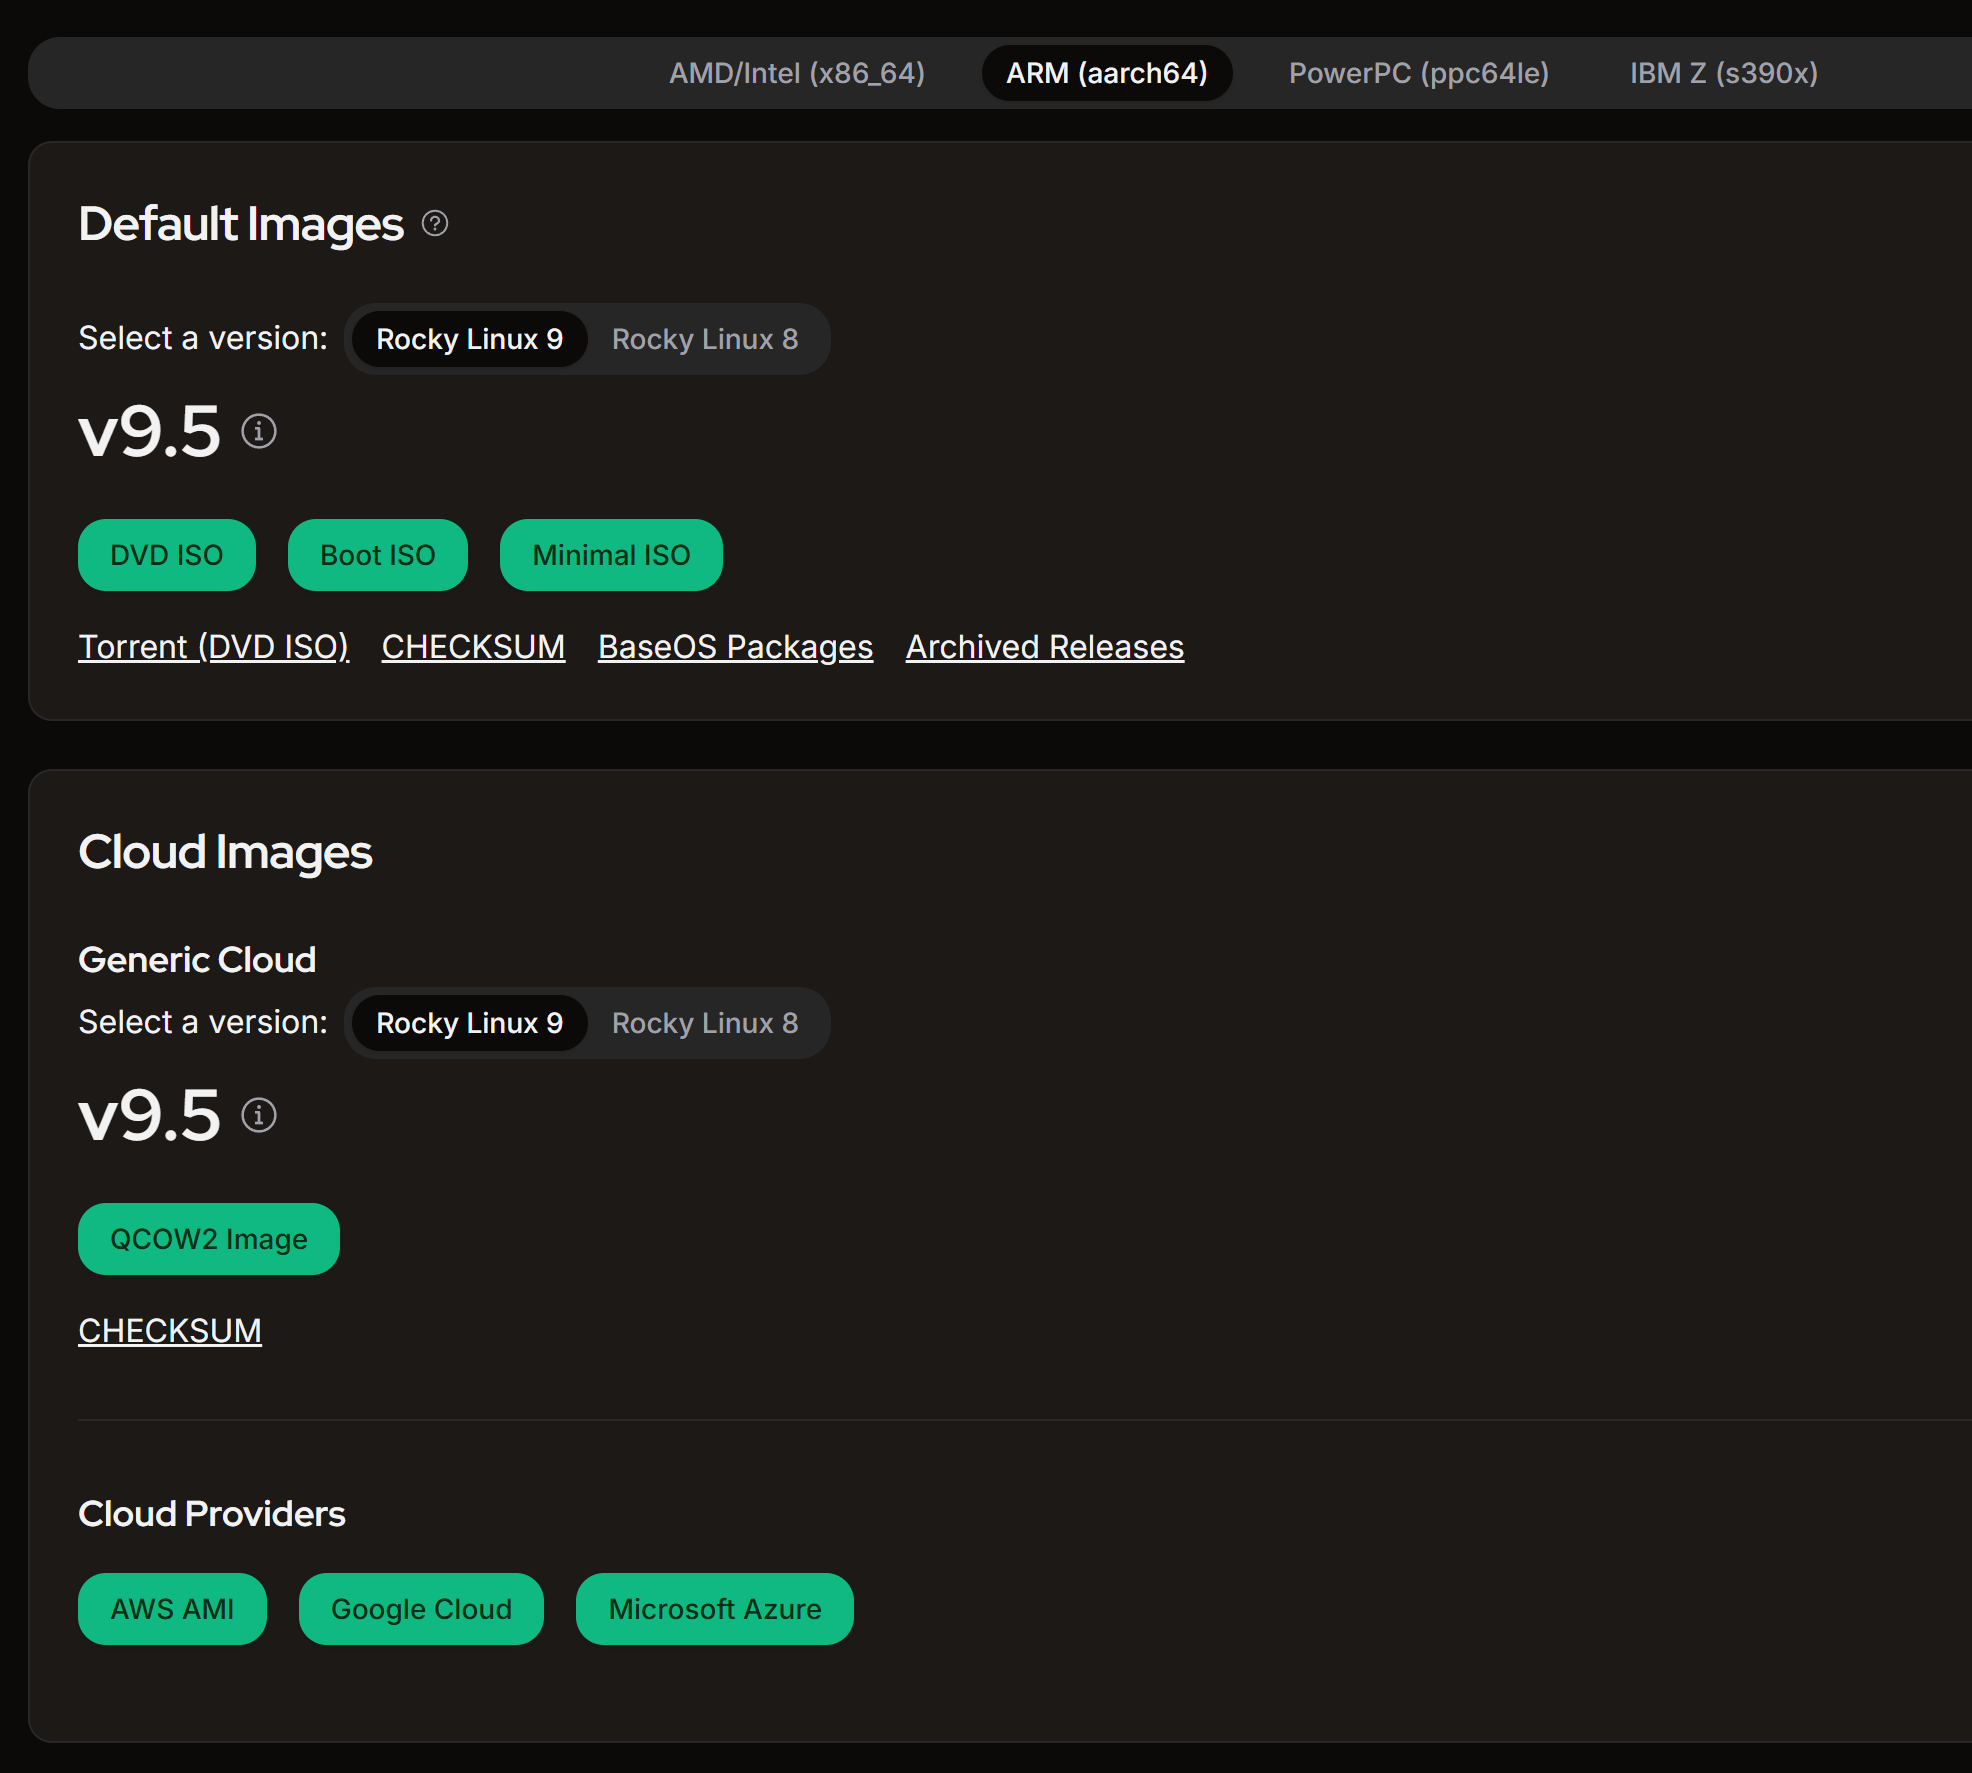
Filter by version number to find the appropriate one.
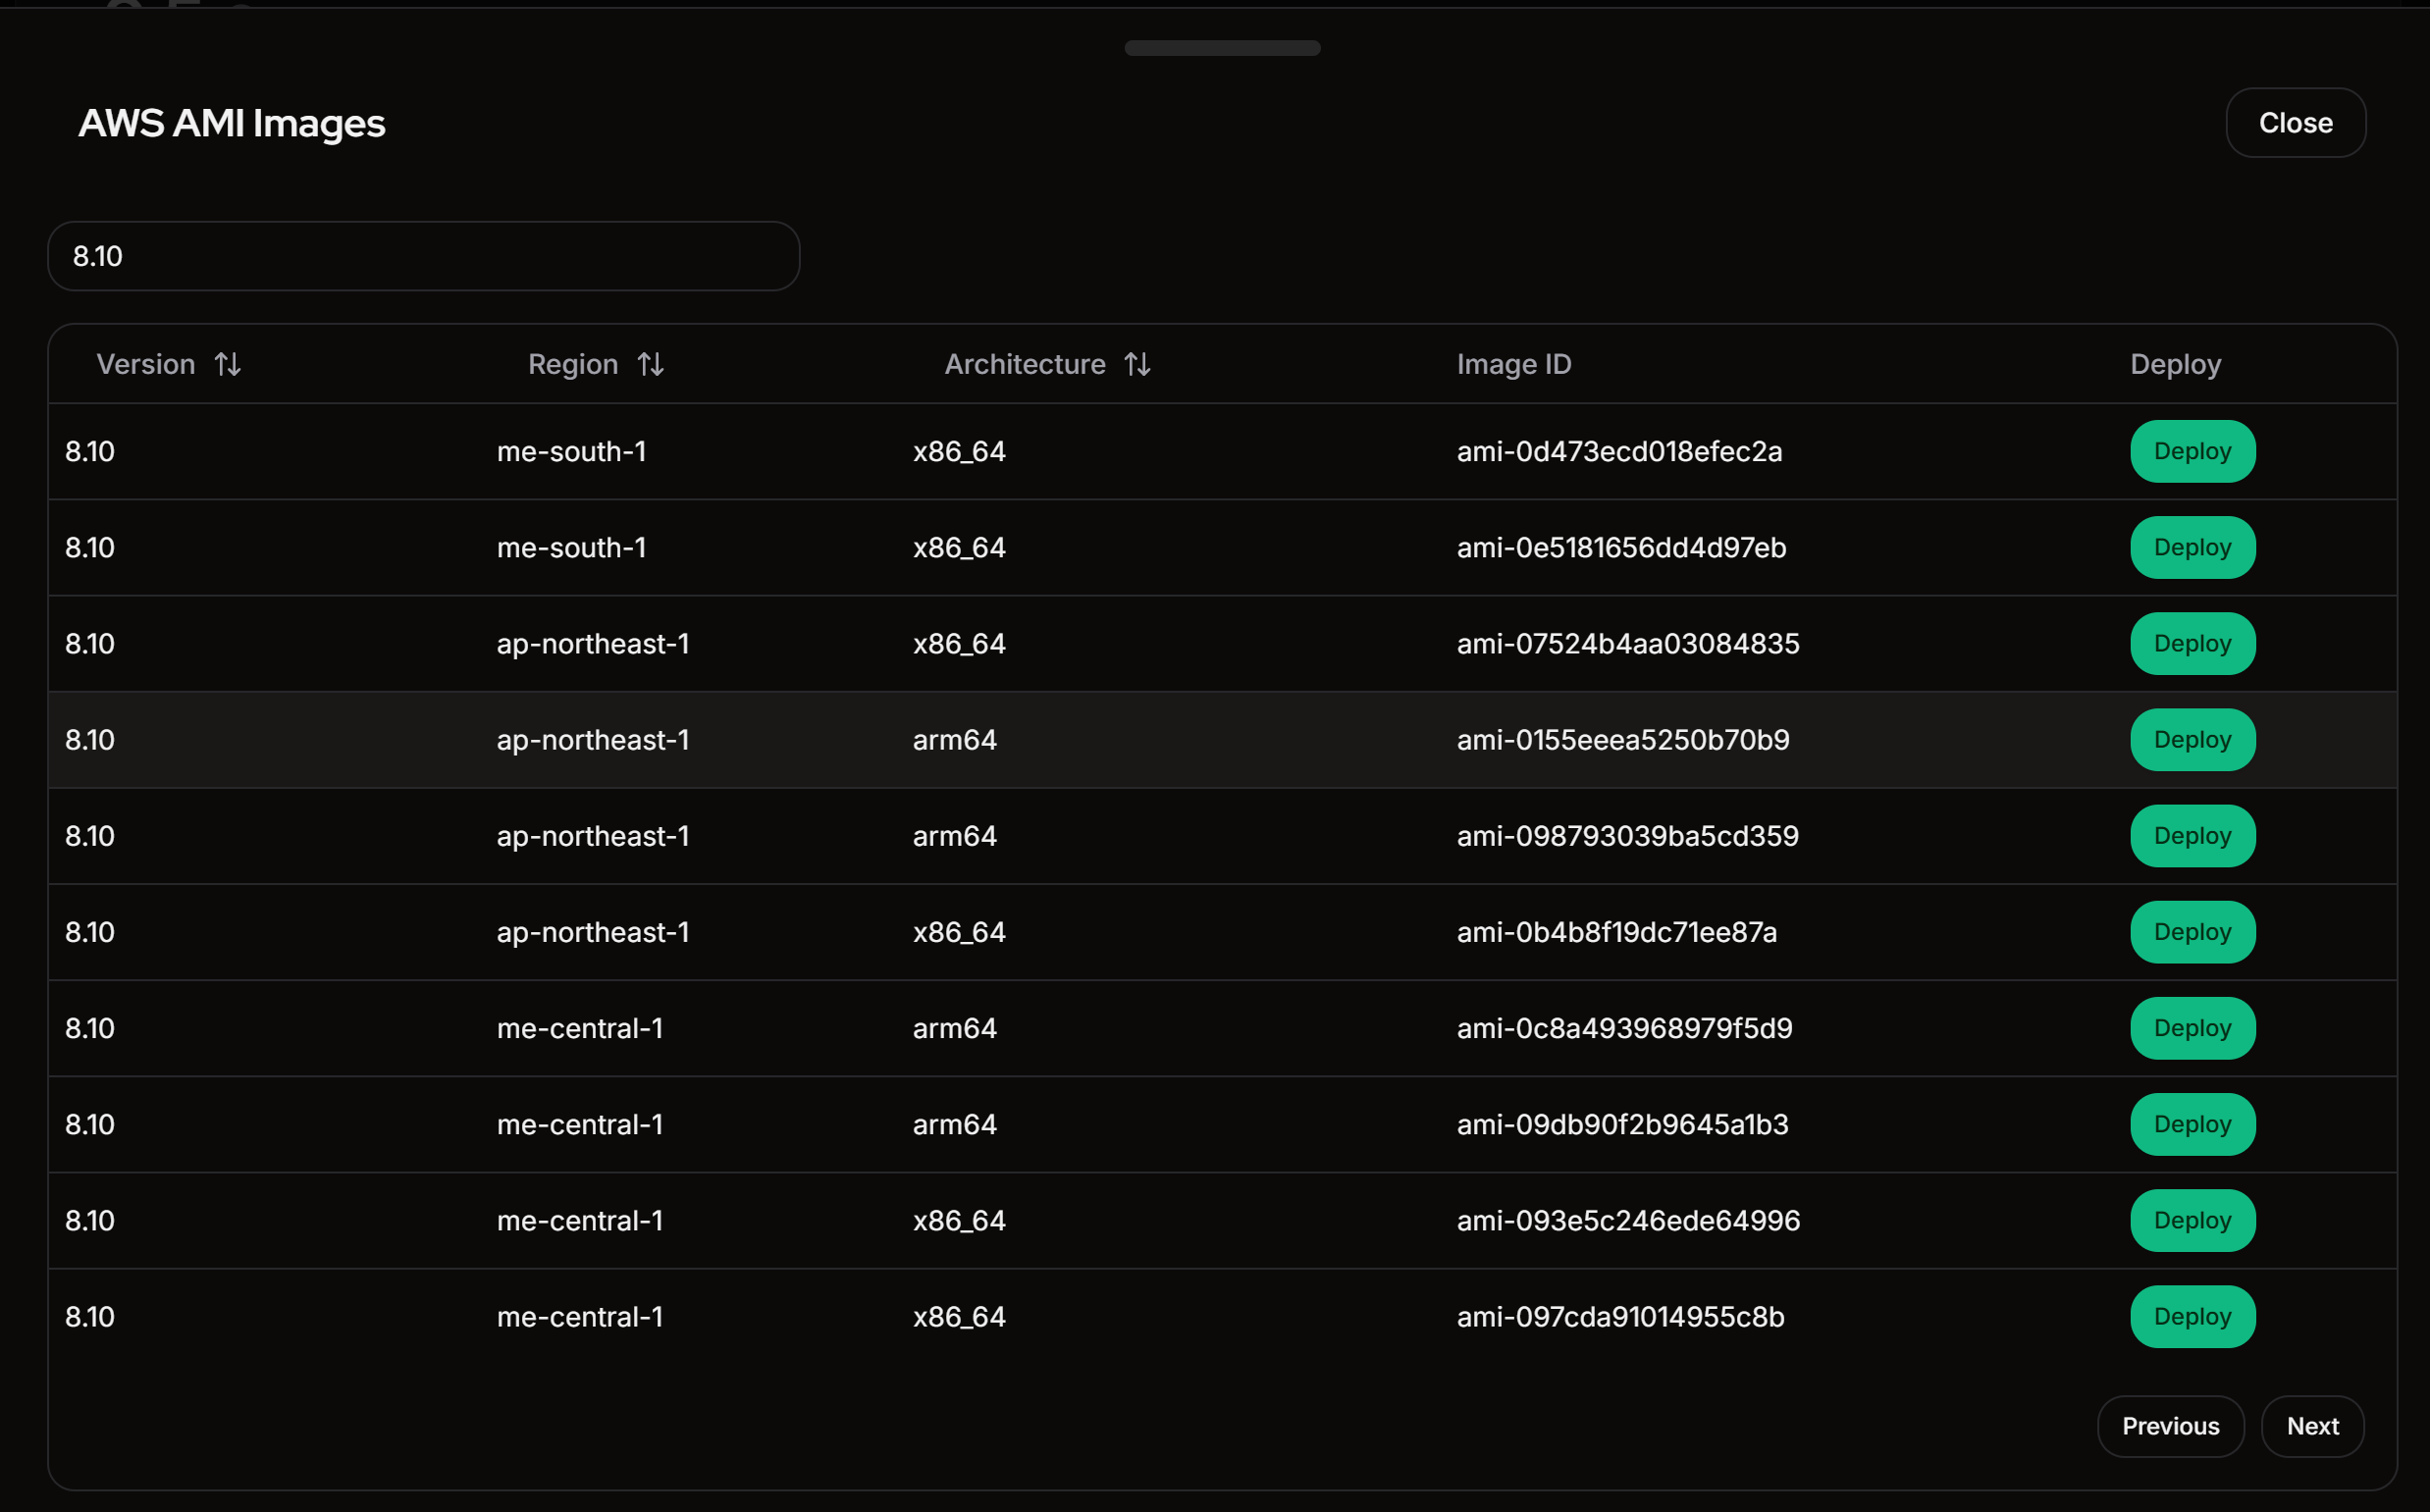
The AMI ID cannot be copied directly, so click the "Deploy" button and copy it from the AWS console.
Searching by AMI ID will show it.
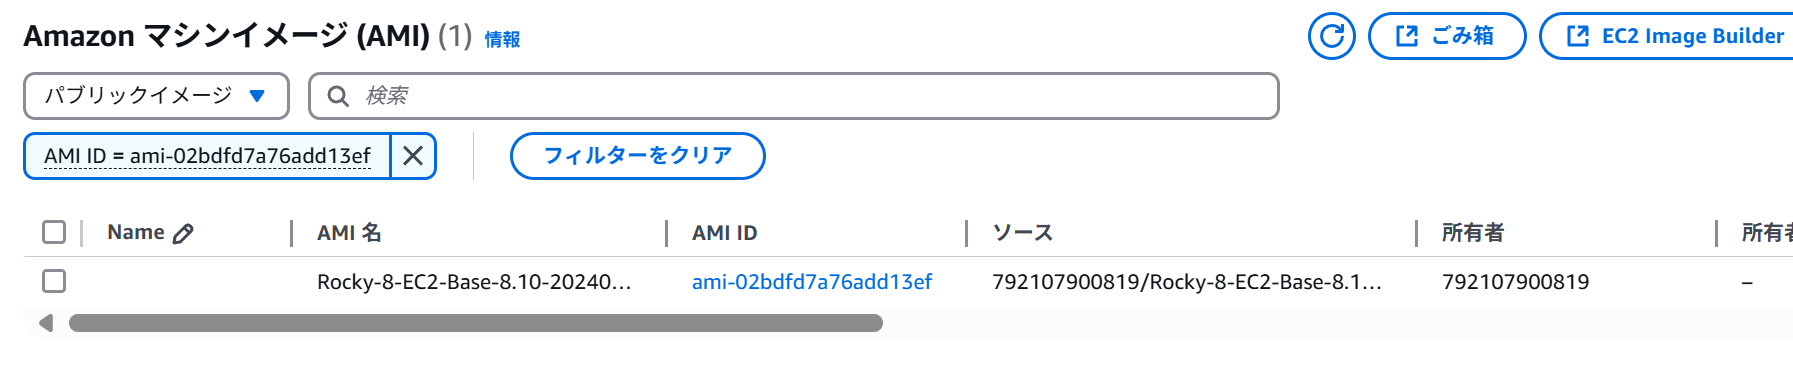
It might be better to filter by owner.
Owner = 792107900819
ssh-keygen -t ed25519 beforehand to create a public key, then import .ssh/id_ed25519.pub into your key pair.aws configure).An Elastic IP is cheaper than a NAT Gateway, so create an Elastic IP.
The network architecture looks like this:
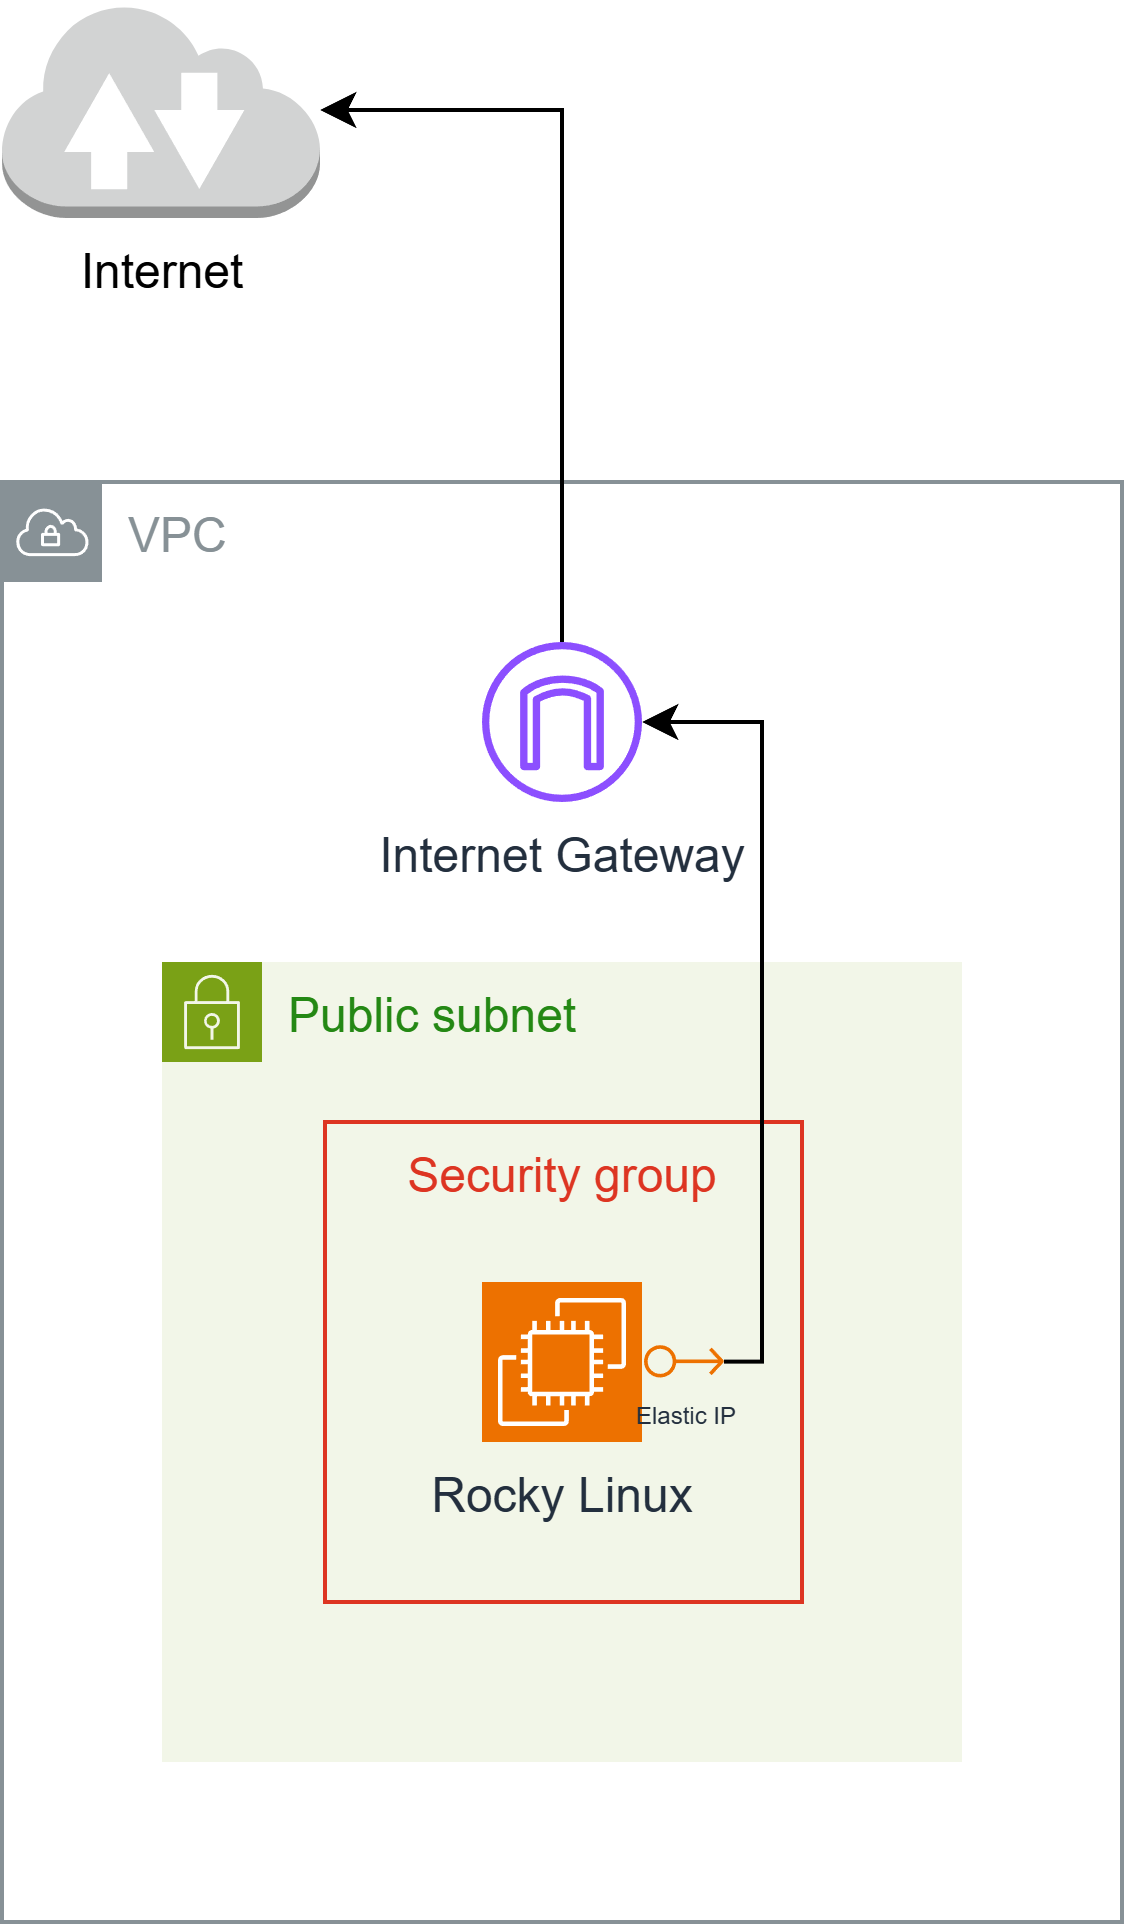

Creating an EC2 Instance Connect Endpoint allows you to log in from the AWS CLI.
Therefore, I launched an instance with the following conditions:
.ssh/id_ed25519.pub)Open your PC's terminal and run the following:
aws ec2-instance-connect ssh --private-key-file .ssh/id_ed25519 --os-user rocky --instance-id i-*****************
The Rocky Linux AMI does not include the Instance Connect package, preventing connections from the Management Console. Therefore, the package must be installed.
Refer to https://docs.aws.amazon.com/ja_jp/AWSEC2/latest/UserGuide/ec2-instance-connect-set-up.html for instructions on downloading the package.
curl https://amazon-ec2-instance-connect-us-west-2.s3.us-west-2.amazonaws.com/latest/linux_arm64/ec2-instance-connect.rhel8.rpm -o /tmp/ec2-instance-connect.rpm
curl https://amazon-ec2-instance-connect-us-west-2.s3.us-west-2.amazonaws.com/latest/linux_amd64/ec2-instance-connect-selinux.noarch.rpm -o /tmp/ec2-instance-connect-selinux.rpm
sudo dnf install -y /tmp/ec2-instance-connect.rpm /tmp/ec2-instance-connect-selinux.rpm
Once installed, you will be able to access the instance from the Management Console.

I've included the CDK code I created for reference.
Remember to change the keyName (key pair) name.
import * as cdk from 'aws-cdk-lib';
import * as ec2 from 'aws-cdk-lib/aws-ec2';

export interface RockyLinuxStackProps extends cdk.StackProps {
}

export class RockyLinuxStack extends cdk.Stack {
  public constructor(scope: cdk.App, id: string, props: RockyLinuxStackProps = {}) {
  super(scope, id, props);

  // Resources
  const ec2dhcpOptions = new ec2.CfnDHCPOptions(this, 'EC2DHCPOptions', {
    domainName: 'ap-south-1.compute.internal',
    domainNameServers: [
    'AmazonProvidedDNS',
    ],
        ],
  });
  ec2dhcpOptions.cfnOptions.deletionPolicy = cdk.CfnDeletionPolicy.DELETE;

  const ec2InternetGateway = new ec2.CfnInternetGateway(this, 'EC2InternetGateway', {
        {
      value: 'igw',
      key: 'Name',
    },
    ],
  });
  ec2InternetGateway.cfnOptions.deletionPolicy = cdk.CfnDeletionPolicy.DELETE;

  const ec2vpc = new ec2.CfnVPC(this, 'EC2VPC', {
    cidrBlock: '10.0.0.0/16',
    enableDnsSupport: true,
    instanceTenancy: 'default',
    enableDnsHostnames: true,
        {
      value: 'vpc',
      key: 'Name',
    },
    ],
  });
  ec2vpc.cfnOptions.deletionPolicy = cdk.CfnDeletionPolicy.DELETE;

  const ec2VPCGatewayAttachment = new ec2.CfnVPCGatewayAttachment(this, 'EC2VPCGatewayAttachment', {
    vpcId: ec2vpc.ref,
    internetGatewayId: ec2InternetGateway.ref,
  });
  ec2VPCGatewayAttachment.cfnOptions.deletionPolicy = cdk.CfnDeletionPolicy.DELETE;

  const ec2NetworkAcl = new ec2.CfnNetworkAcl(this, 'EC2NetworkAcl', {
    vpcId: ec2vpc.ref,
        ],
  });
  ec2NetworkAcl.cfnOptions.deletionPolicy = cdk.CfnDeletionPolicy.DELETE;

  const ec2RouteTable = new ec2.CfnRouteTable(this, 'EC2RouteTable', {
    vpcId: ec2vpc.ref,
  });
  ec2RouteTable.cfnOptions.deletionPolicy = cdk.CfnDeletionPolicy.DELETE;

  const ec2SecurityGroup = new ec2.CfnSecurityGroup(this, 'EC2SecurityGroup', {
    groupDescription: 'launch-wizard-1 created 2025-04-27T00:11:58.641Z',
    groupName: 'launch-wizard-1',
    vpcId: ec2vpc.ref,
    securityGroupIngress: [
    {
      cidrIp: '0.0.0.0/0',
      ipProtocol: 'tcp',
      fromPort: 22,
      toPort: 22,
    },
    {
      cidrIp: '0.0.0.0/0',
      ipProtocol: 'icmp',
      fromPort: 8,
      toPort: -1,
    },
    ],
    securityGroupEgress: [
    {
      cidrIp: '0.0.0.0/0',
      ipProtocol: '-1',
      fromPort: -1,
      toPort: -1,
    },
    ],
  });
  ec2SecurityGroup.cfnOptions.deletionPolicy = cdk.CfnDeletionPolicy.DELETE;

  const ec2Subnet = new ec2.CfnSubnet(this, 'EC2Subnet', {
    vpcId: ec2vpc.ref,
    mapPublicIpOnLaunch: false,
    enableDns64: false,
    availabilityZoneId: 'aps1-az1',
    privateDnsNameOptionsOnLaunch: {
    EnableResourceNameDnsARecord: false,
    HostnameType: 'ip-name',
    EnableResourceNameDnsAAAARecord: false,
    },
    cidrBlock: '10.0.0.0/20',
    ipv6Native: false,
        {
      value: 'subnet-public1-ap-south-1a',
      key: 'Name',
    },
    ],
  });
  ec2Subnet.cfnOptions.deletionPolicy = cdk.CfnDeletionPolicy.DELETE;

  const ec2InstanceConnectEndpoint = new ec2.CfnInstanceConnectEndpoint(this, 'EC2InstanceConnectEndpoint', {
    preserveClientIp: false,
    securityGroupIds: [
    ec2SecurityGroup.attrGroupId,
    ],
    subnetId: ec2Subnet.attrSubnetId,
  });
  ec2InstanceConnectEndpoint.cfnOptions.deletionPolicy = cdk.CfnDeletionPolicy.DELETE;

  const ec2vpcdhcpOptionsAssociation = new ec2.CfnVPCDHCPOptionsAssociation(this, 'EC2VPCDHCPOptionsAssociation', {
    vpcId: ec2vpc.ref,
    dhcpOptionsId: ec2dhcpOptions.ref,
  });
  ec2vpcdhcpOptionsAssociation.cfnOptions.deletionPolicy = cdk.CfnDeletionPolicy.DELETE;

  const ec2RouteHg = new ec2.CfnRoute(this, 'EC2RouteHG', {
    routeTableId: ec2RouteTable.ref,
    destinationCidrBlock: '0.0.0.0/0',
    gatewayId: ec2InternetGateway.ref,
  });
  ec2RouteHg.cfnOptions.deletionPolicy = cdk.CfnDeletionPolicy.DELETE;

  const ec2SubnetNetworkAclAssociation = new ec2.CfnSubnetNetworkAclAssociation(this, 'EC2SubnetNetworkAclAssociation', {
    networkAclId: ec2NetworkAcl.ref,
    subnetId: ec2Subnet.ref,
  });
  ec2SubnetNetworkAclAssociation.cfnOptions.deletionPolicy = cdk.CfnDeletionPolicy.DELETE;

  const ec2SubnetRouteTableAssociation = new ec2.CfnSubnetRouteTableAssociation(this, 'EC2SubnetRouteTableAssociation', {
    routeTableId: ec2RouteTable.ref,
    subnetId: ec2Subnet.ref,
  });
  ec2SubnetRouteTableAssociation.cfnOptions.deletionPolicy = cdk.CfnDeletionPolicy.DELETE;

  const ec2Instance = new ec2.CfnInstance(this, 'EC2Instance', {
    tenancy: 'default',
    instanceInitiatedShutdownBehavior: 'stop',
    cpuOptions: {
    threadsPerCore: 1,
    coreCount: 2,
    },
    blockDeviceMappings: [
    {
      ebs: {
      volumeType: 'gp3',
      iops: 3000,
      volumeSize: 10,
      encrypted: false,
      deleteOnTermination: true,
      },
      deviceName: '/dev/sda1',
    },
    ],
    availabilityZone: 'ap-south-1a',
    privateDnsNameOptions: {
    enableResourceNameDnsARecord: false,
    hostnameType: 'ip-name',
    enableResourceNameDnsAaaaRecord: false,
    },
    ebsOptimized: true,
    disableApiTermination: false,
    keyName: 'hikari',
    sourceDestCheck: true,
    placementGroupName: '',
    networkInterfaces: [
    {
      privateIpAddresses: [
      {
        privateIpAddress: '10.0.3.59',
        primary: true,
      },
      ],
      secondaryPrivateIpAddressCount: 0,
      deviceIndex: '0',
      groupSet: [
      ec2SecurityGroup.ref,
      ],
      ipv6Addresses: [
      ],
      subnetId: ec2Subnet.ref,
      associatePublicIpAddress: true,
      deleteOnTermination: true,
    },
    ],
    imageId: 'ami-0415efd8380284dc4',
    instanceType: 't4g.medium',
    monitoring: false,
        ],
    creditSpecification: {
    cpuCredits: 'unlimited',
    },
  });
  ec2Instance.cfnOptions.deletionPolicy = cdk.CfnDeletionPolicy.DELETE;

  const ec2ElasticIp = new ec2.CfnEIP(this, 'EC2ElasticIp', {
    domain: 'vpc',
        {
      key: 'Name',
      value: 'elastic-ip',
    },
    ],
  });
  ec2ElasticIp.cfnOptions.deletionPolicy = cdk.CfnDeletionPolicy.DELETE;

  const ec2EipAssociation = new ec2.CfnEIPAssociation(this, 'EC2EipAssociation', {
    eip: ec2ElasticIp.ref,
    instanceId: ec2Instance.ref,
  });
  ec2EipAssociation.cfnOptions.deletionPolicy = cdk.CfnDeletionPolicy.DELETE;
  }
}
※ The free software mentioned here is generally free to use and is distinct from open-source software.
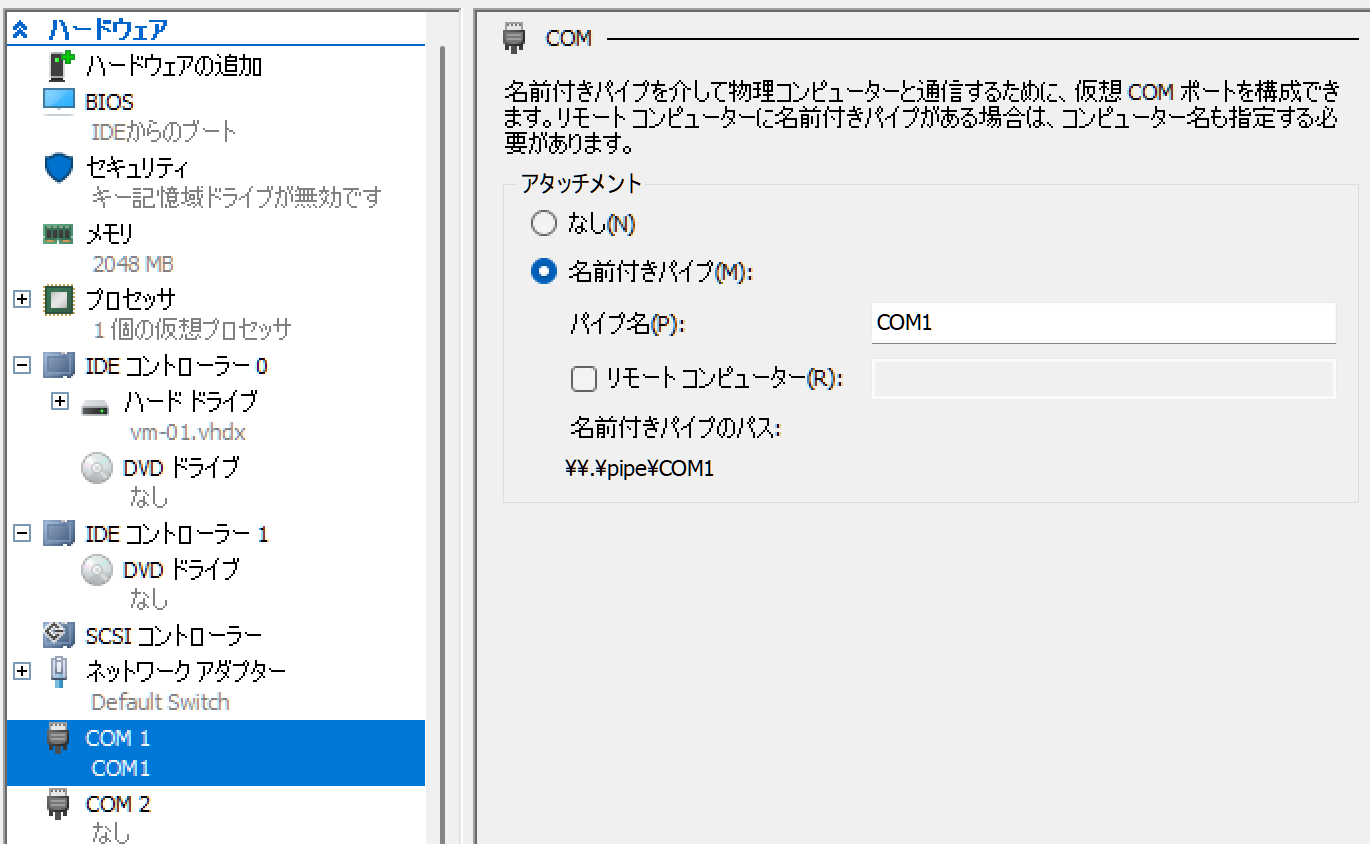
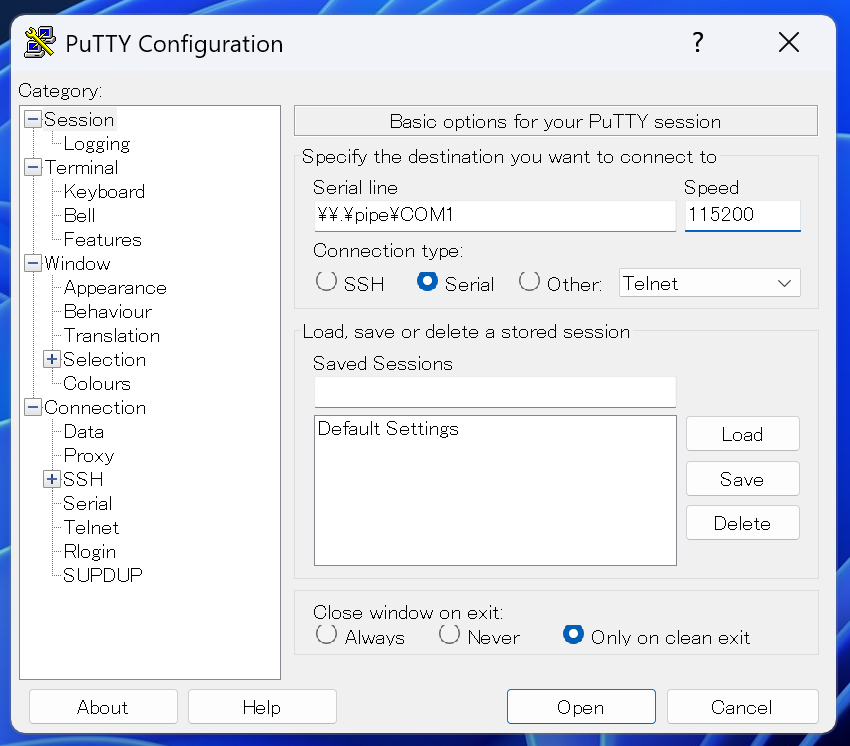
Select "Named pipe" and set the pipe name to "COM1".
Open the GRUB configuration file with sudo nano /etc/default/grub.
GRUB_CMDLINE_LINUX_DEFAULT="quiet splash console=ttyS0,115200n8"
After saving, apply the GRUB settings with:
sudo update-grub
Configure the service to allow login via the serial port.
sudo systemctl enable [email protected]
sudo systemctl start [email protected]
Launch as administrator.
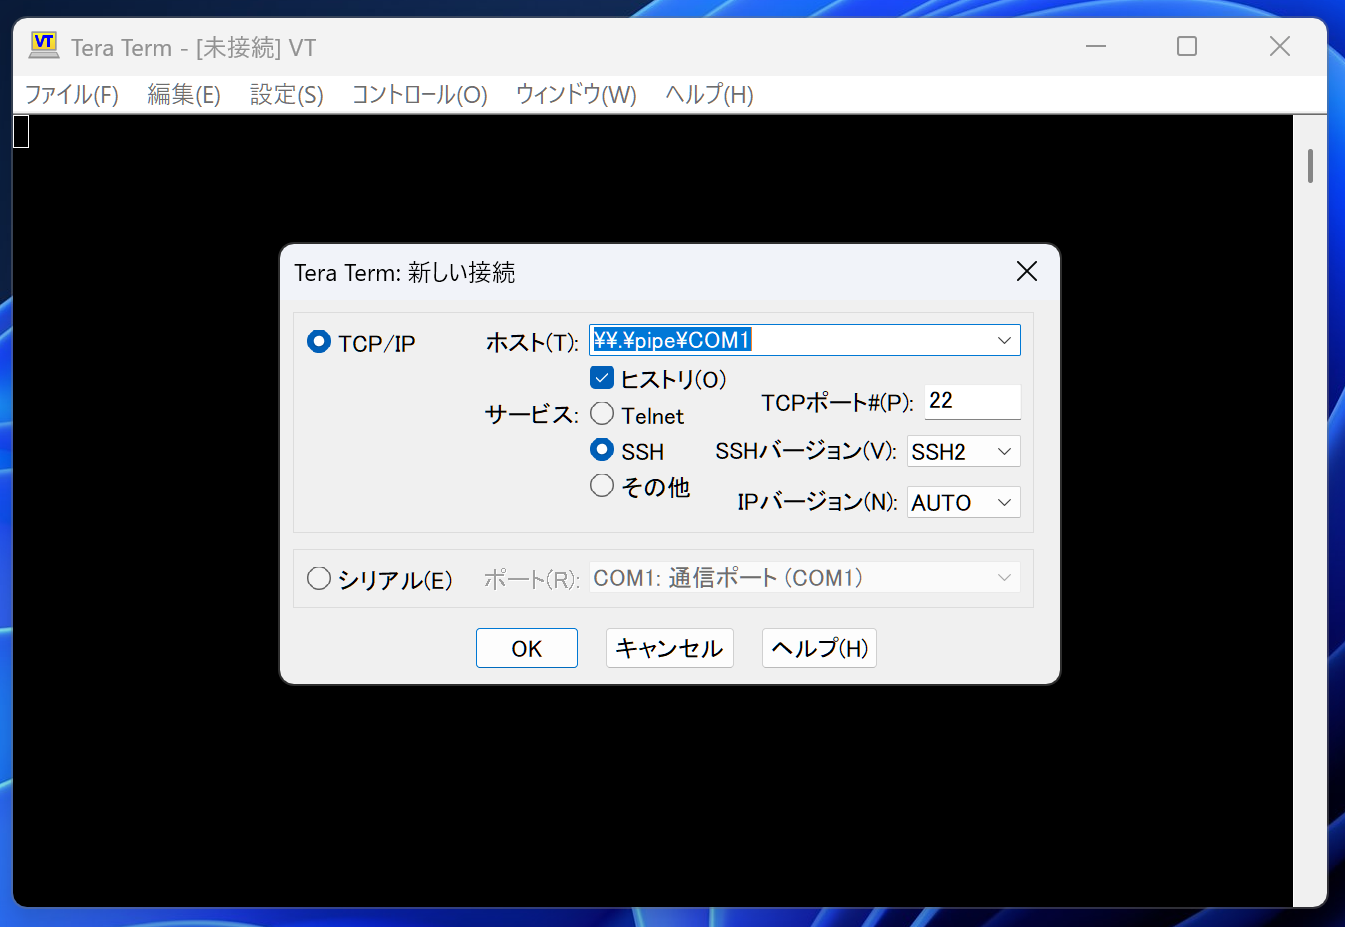
Launch as administrator.
| Serial line | Speed | Connection type: |
|---|---|---|
| \.\pipe\COM1 | 115200 | Serial |
Set the above.
Launch as administrator.
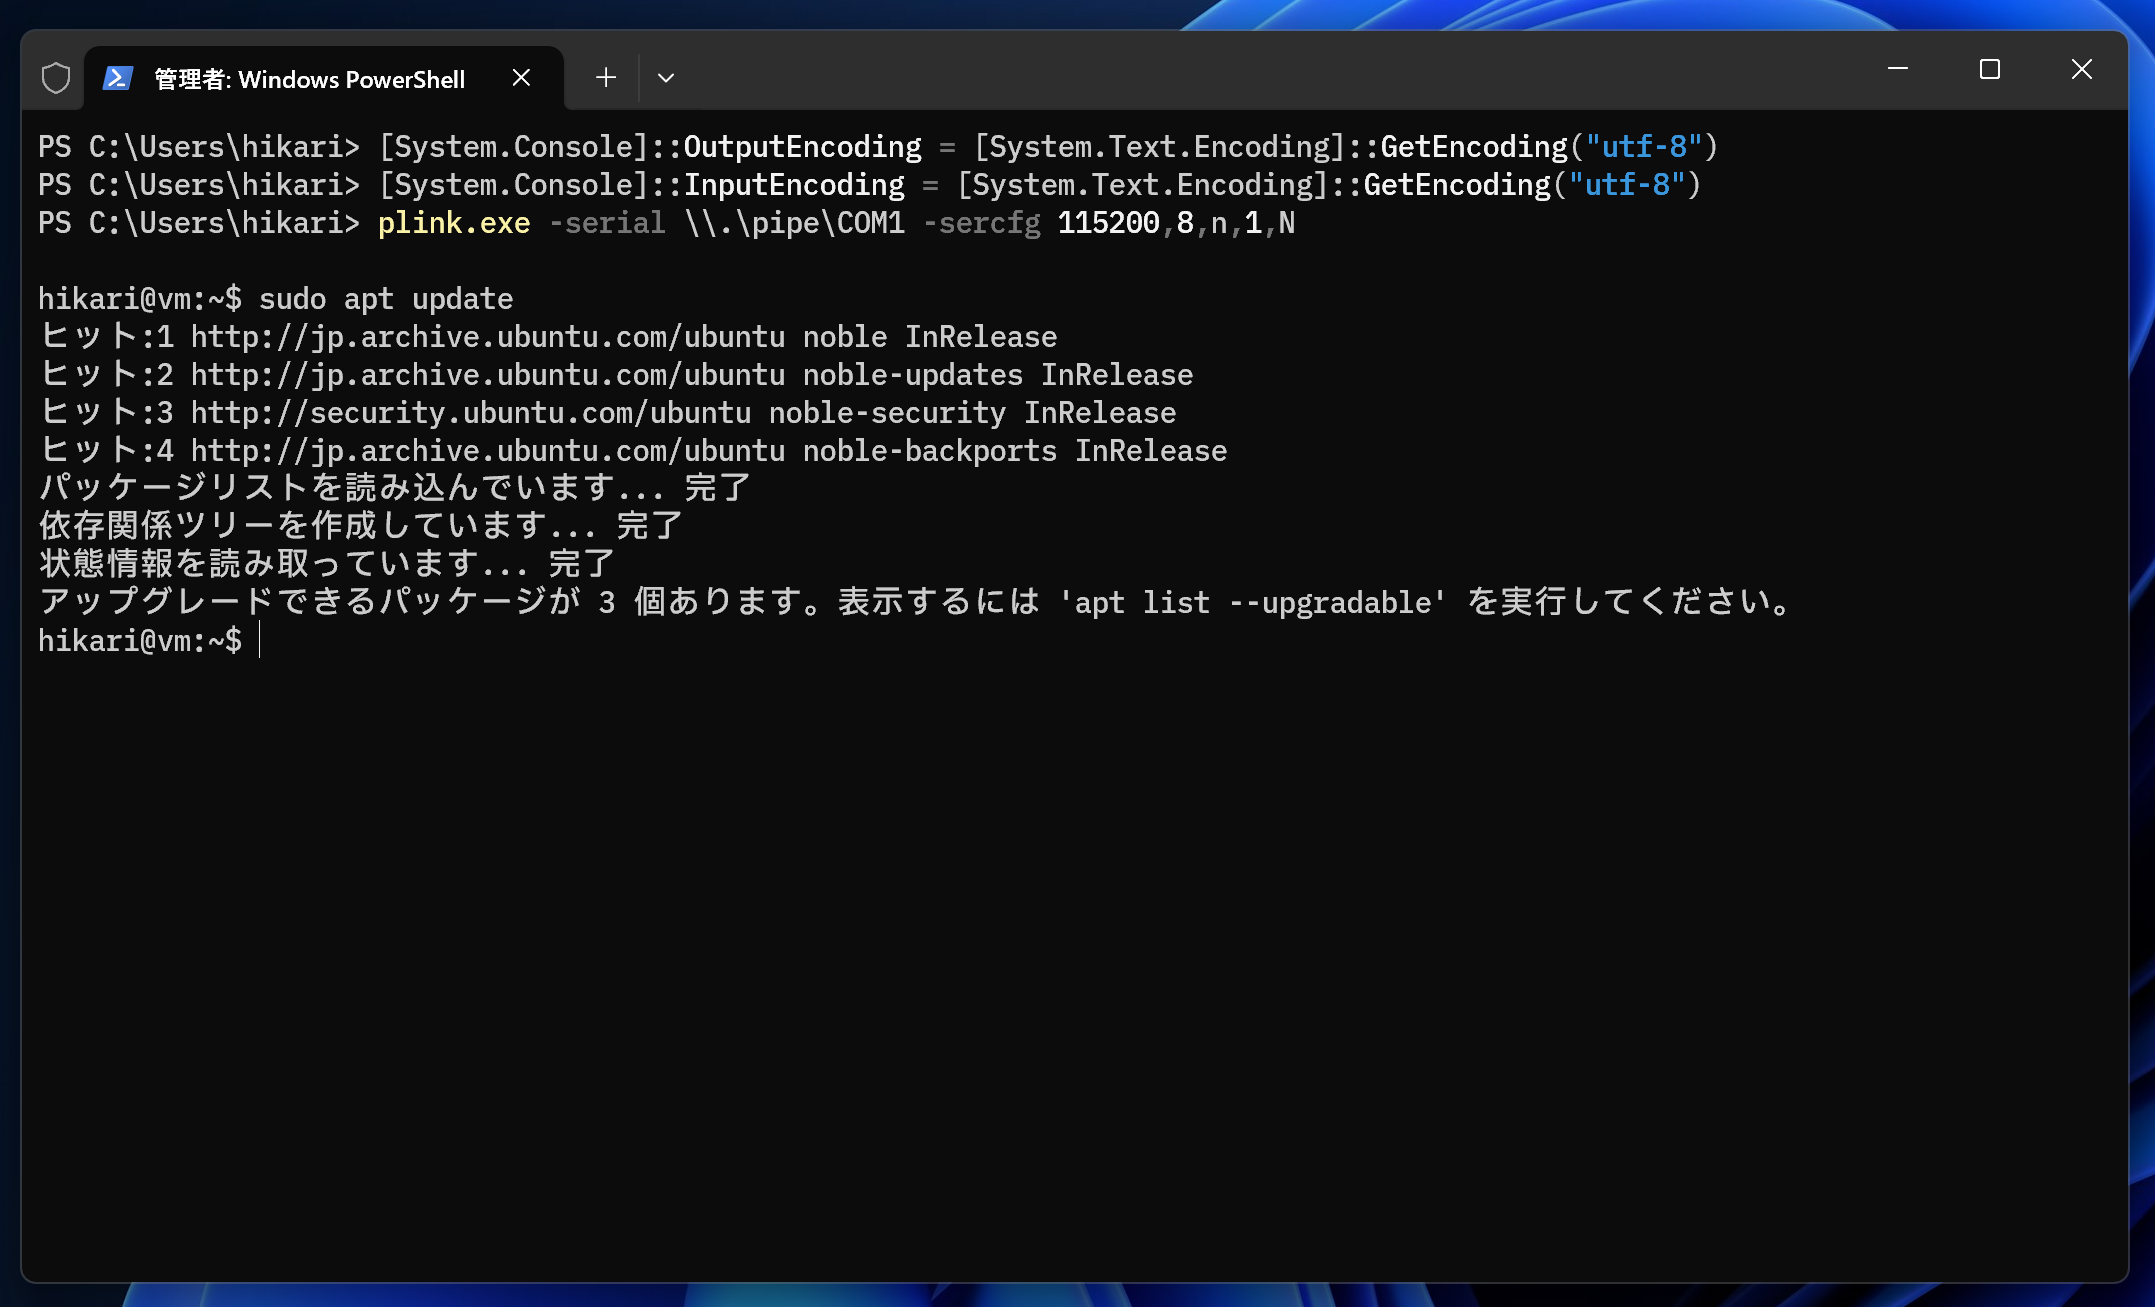
[System.Console]::OutputEncoding = [System.Text.Encoding]::GetEncoding("utf-8")
[System.Console]::InputEncoding = [System.Text.Encoding]::GetEncoding("utf-8")
plink.exe -serial \\.\pipe\COM1 -sercfg 115200,8,n,1,N
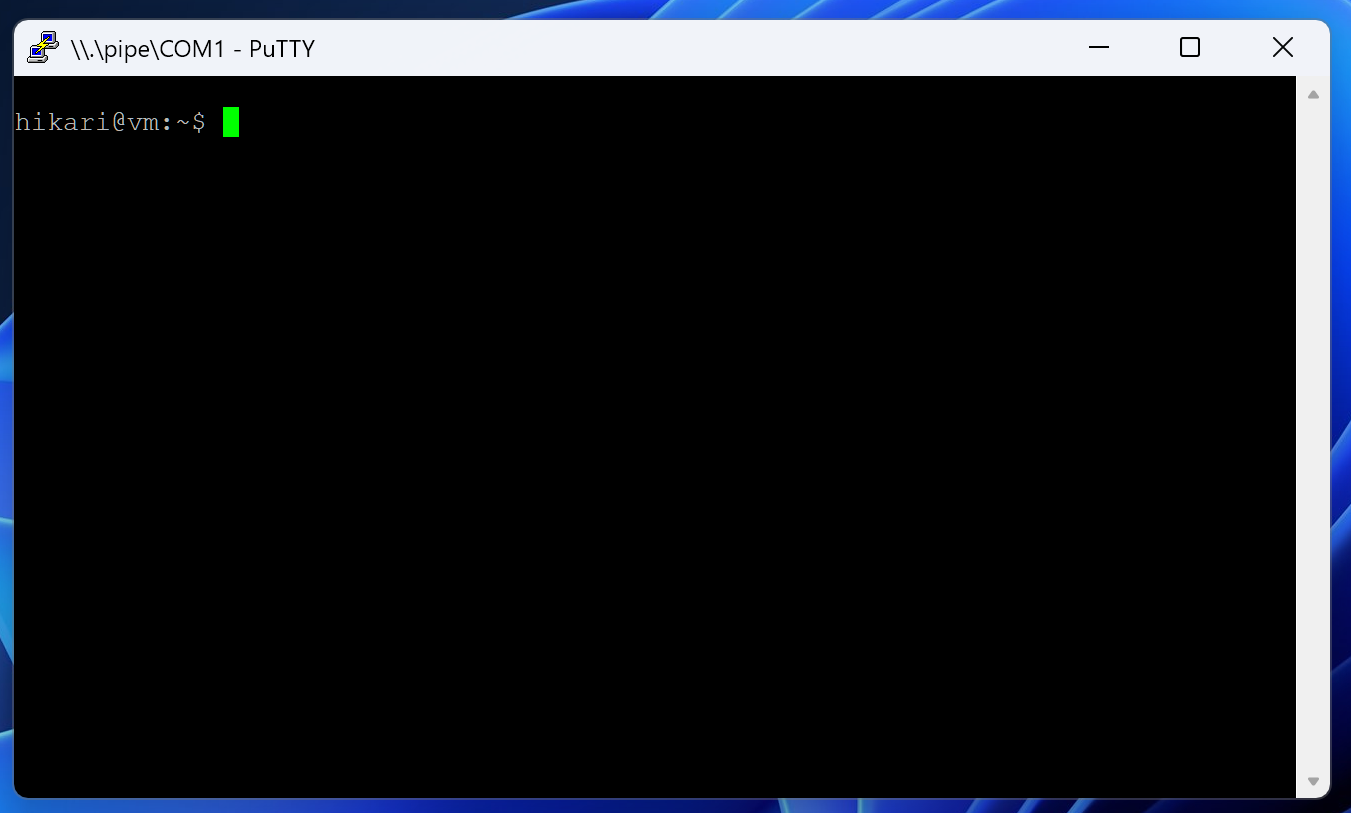
Exit with Ctrl + C.
VOICEVOX is stated to be composed of an editor, an engine, and a core.
Reference: Overall Structure
It seems the editor is the application, the engine is an HTTP server, and the core is a module that performs speech synthesis processing.
This implies that the editor makes REST API calls (hereinafter referred to as API) to the engine.
So, this article will observe the content of that API.
Wireshark was used to capture the API traffic.
Here are the results after filtering with http and tcp.port == 50021.
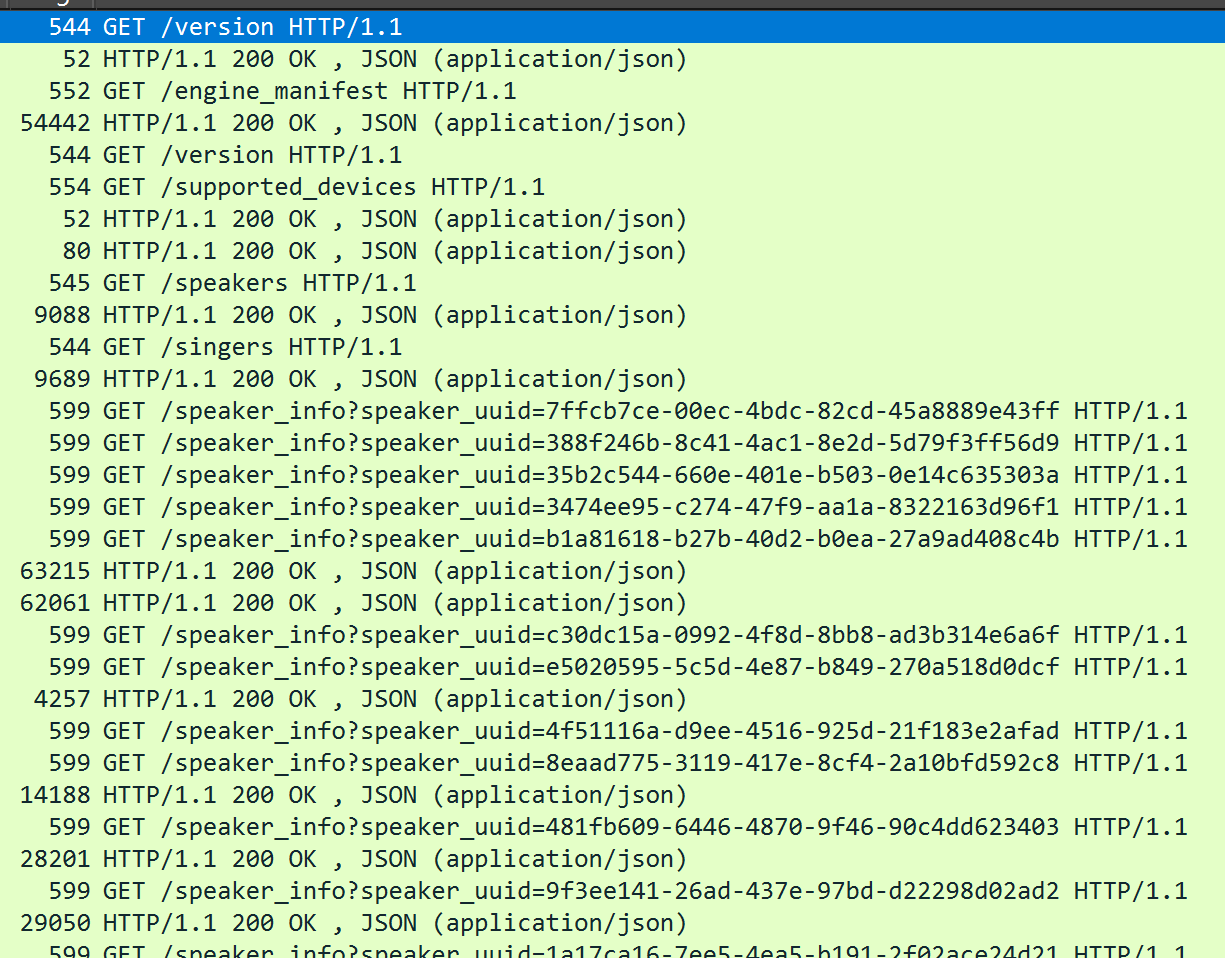
The following information appears to be read on startup:
/version/engine_manifest/speakers (character list like Zundamon)/singers (same as above)After obtaining speaker/singer information, more detailed information for each character is retrieved (e.g., /speaker_info?speaker_uuid=xxx, /singer_info?speaker_uuid=xxx).
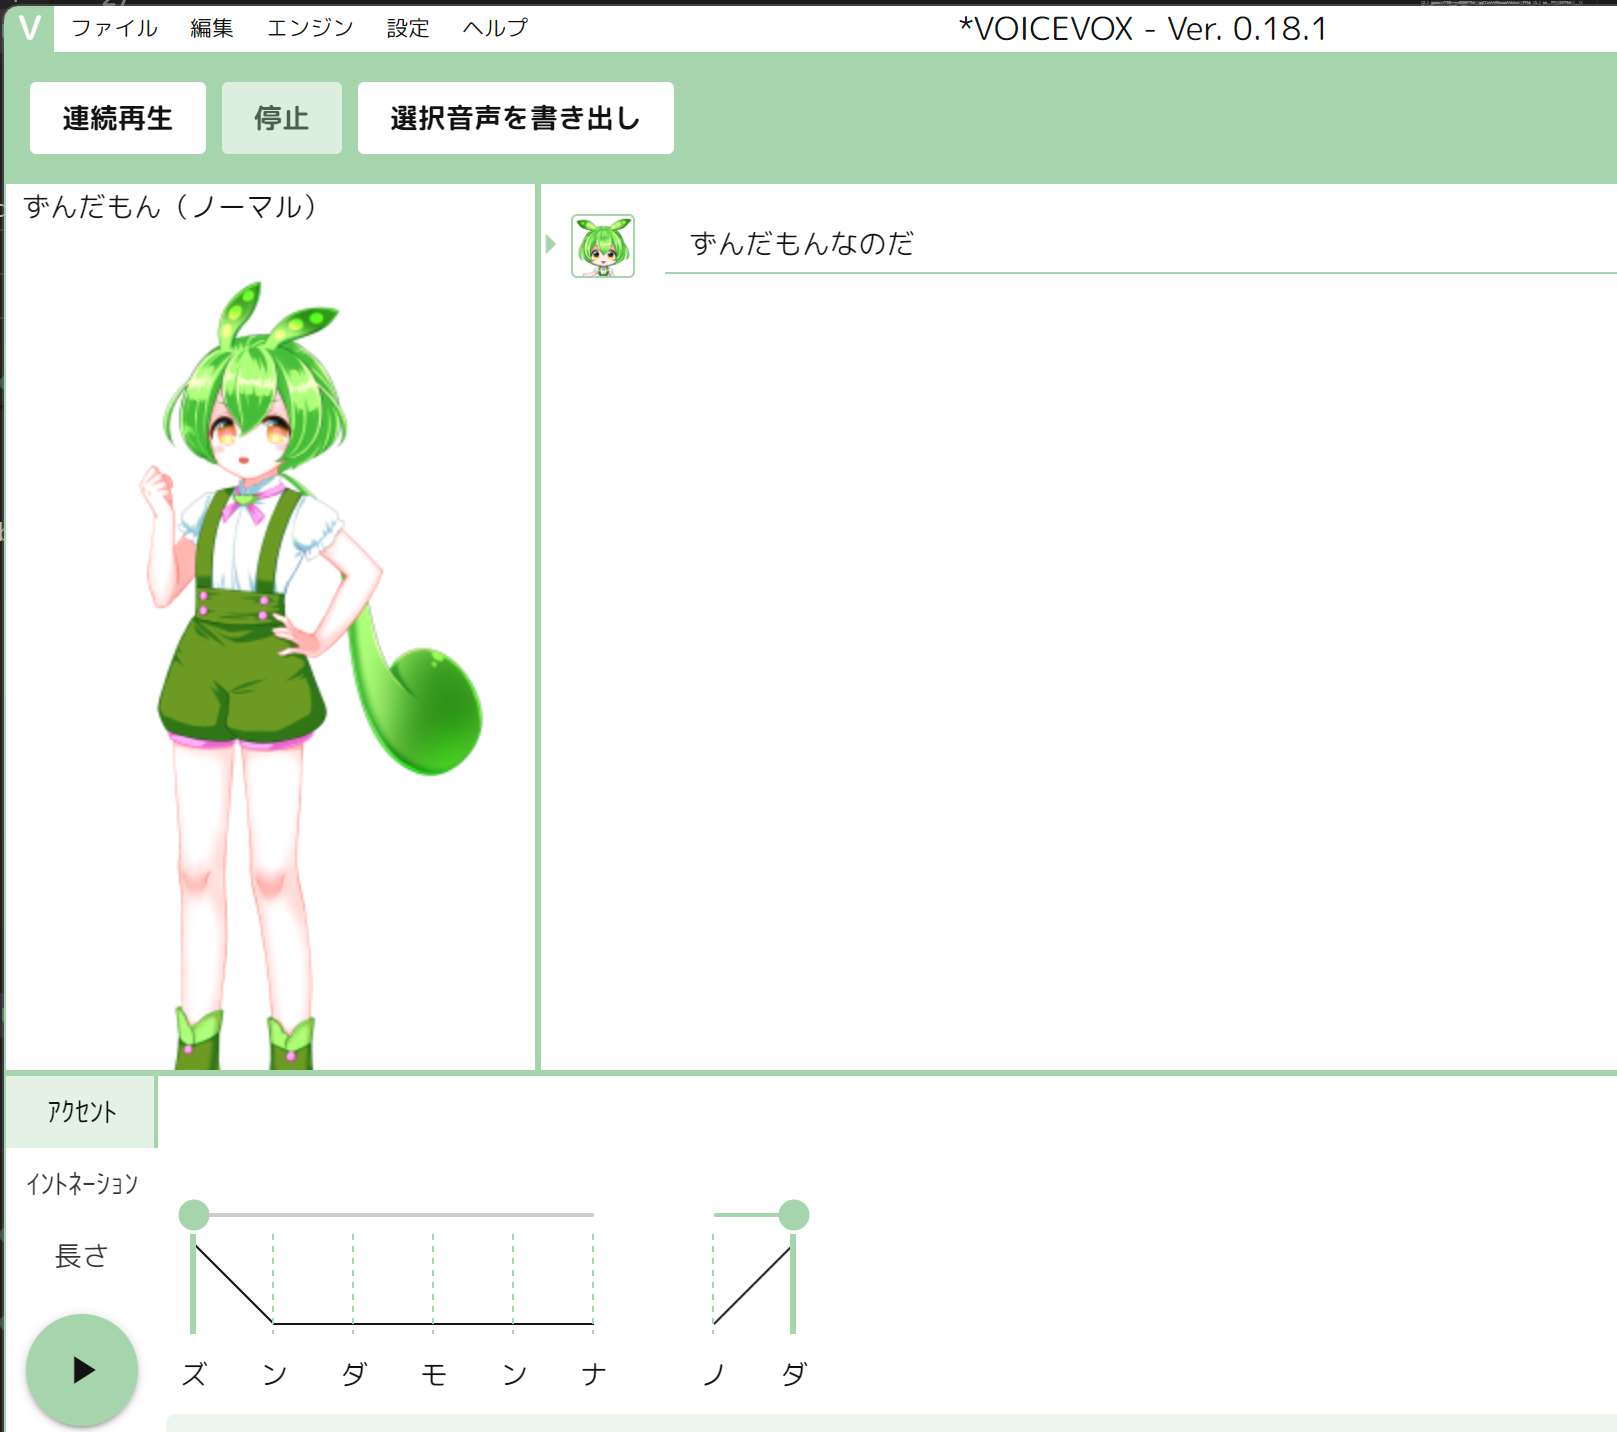
Now, I sent a speech synthesis request with Zundamon and peeked at the API.

It seems that audio is acquired in the following flow:
/accent_phrases/synthesis?speaker=3The request body sent in (2.) is similar to the response from (1.).
Therefore, the flow appears to be: get accents in (1.), then synthesize speech from those accents in (2.).
I used the httpie tool to call the API.

It was found that Zundamon (Normal) has an ID of 3.
I tried to get accent information for ずんだもんなのだ (Zundamon nanoda).
(Unlike speaker information, this is retrieved with a POST request.)
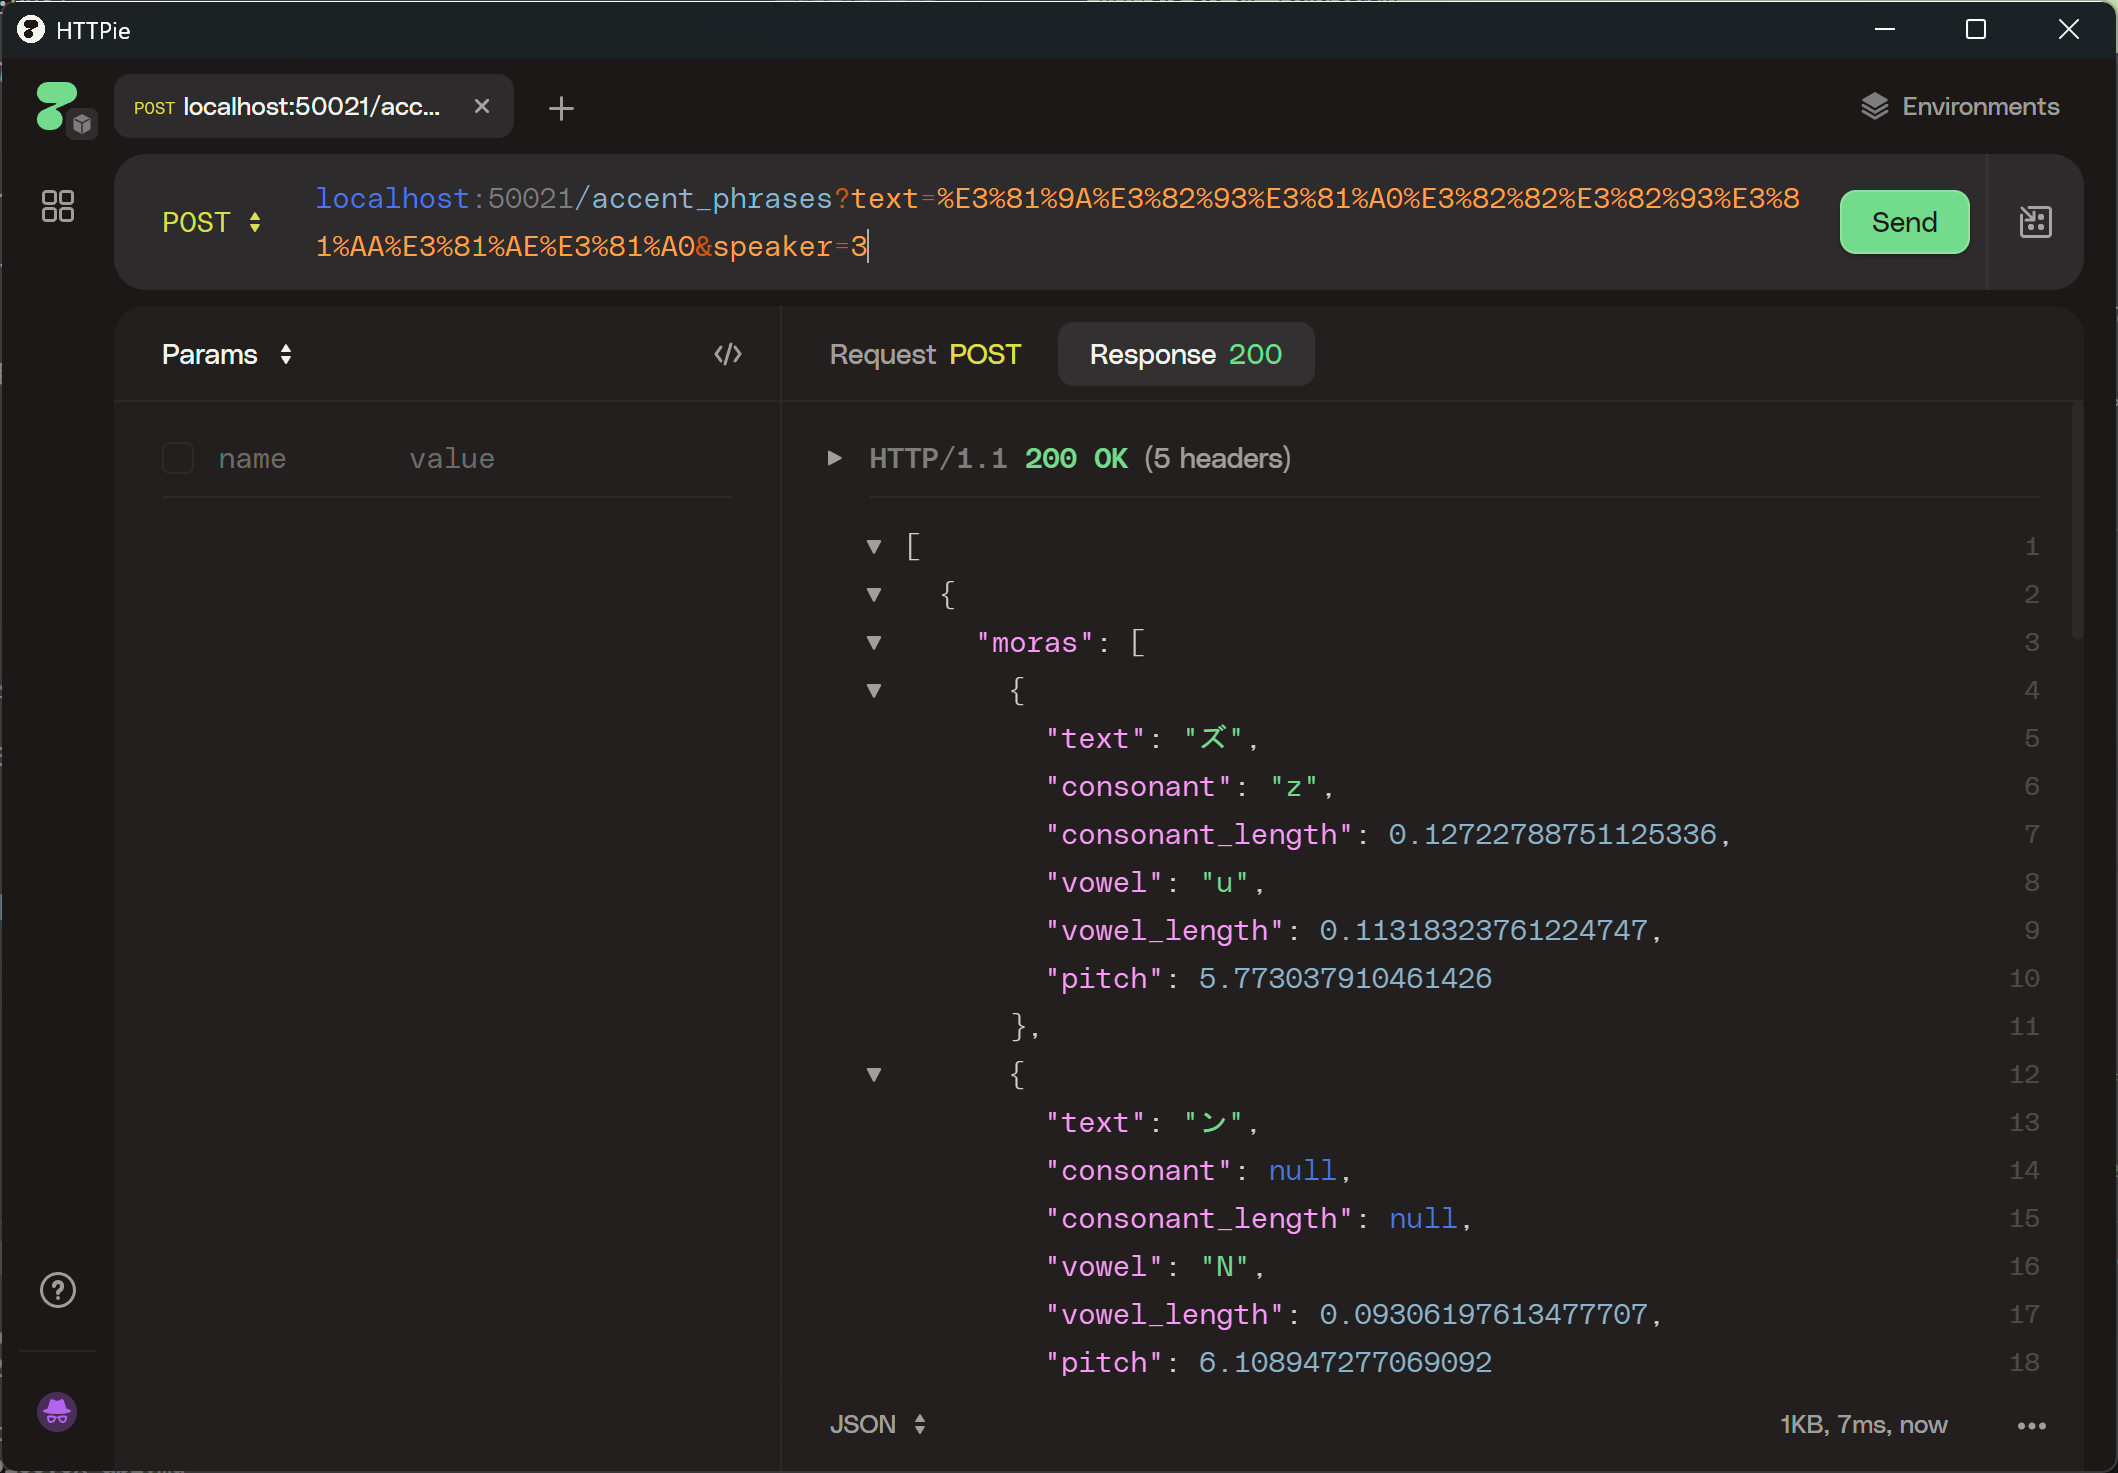
Create a request body like the following:
{
  "accent_phrases": </data obtained from /accent_phrases>,
  "speedScale": 1,
  "pitchScale": 0,
  "intonationScale": 1,
  "volumeScale": 1,
  "prePhonemeLength": 0.1,
  "postPhonemeLength": 0.1,
  "outputSamplingRate": 24000,
  "outputStereo": false,
  "kana": ""
}
Since httpie cannot handle WAV files, I will send the request using PowerShell.
# Define URL and JSON data
$url = 'http://localhost:50021/synthesis?speaker=3'
$jsonBody = @"
{
  "accent_phrases": [
    {
      "moras": [
        {
          "text": "ズ",
          "consonant": "z",
          "consonant_length": 0.12722788751125336,
          "vowel": "u",
          "vowel_length": 0.11318323761224747,
          "pitch": 5.773037910461426
        },
        {
          "text": "ン",
          "consonant": null,
          "consonant_length": null,
          "vowel": "N",
          "vowel_length": 0.09306197613477707,
          "pitch": 6.108947277069092
        },
        {
          "text": "ダ",
          "consonant": "d",
          "consonant_length": 0.04249810427427292,
          "vowel": "a",
          "vowel_length": 0.09372275322675705,
          "pitch": 6.09743070602417
        },
        {
          "text": "モ",
          "consonant": "m",
          "consonant_length": 0.07012023776769638,
          "vowel": "o",
          "vowel_length": 0.1172478124499321,
          "pitch": 5.932623386383057
        },
        {
          "text": "ン",
          "consonant": null,
          "consonant_length": null,
          "vowel": "N",
          "vowel_length": 0.06496299058198929,
          "pitch": 5.745952129364014
        },
        {
          "text": "ナ",
          "consonant": "n",
          "consonant_length": 0.038462959229946136,
          "vowel": "a",
          "vowel_length": 0.08576127141714096,
          "pitch": 5.5794854164123535
        }
      ],
      "accent": 1,
      "pause_mora": null,
      "is_interrogative": false
    },
    {
      "moras": [
        {
          "text": "ノ",
          "consonant": "n",
          "consonant_length": 0.05504273623228073,
          "vowel": "o",
          "vowel_length": 0.0903041884303093,
          "pitch": 5.551316261291504
        },
        {
          "text": "ダ",
          "consonant": "d",
          "consonant_length": 0.05024997144937515,
          "vowel": "a",
          "vowel_length": 0.20450790226459503,
          "pitch": 5.633930206298828
        }
      ],
      "accent": 2,
      "pause_mora": null,
      "is_interrogative": false
    }
  ],
  "speedScale": 1,
  "pitchScale": 0,
  "intonationScale": 1,
  "volumeScale": 1,
  "prePhonemeLength": 0.1,
  "postPhonemeLength": 0.1,
  "outputSamplingRate": 24000,
  "outputStereo": false,
  "kana": ""
}
"@

# Create HTTP headers
$headers = @{
    'Content-Type' = 'application/json'
}

# Send POST request and get response
$response = Invoke-WebRequest -Uri $url -Method Post -Headers $headers -Body $jsonBody -OutFile "output.wav"

# Open and play
start output.wav
VOICEVOX: Zundamon
That's all!
Hexadecimal problems use binary.
Convert the hexadecimal number to binary. 0.248(16) = 0.0010 0100 1000(2)
Remove the decimal point. 0.0010 0100 1000(2) = 0.0010 0100 1000(2) × 0010 0000 0000(2) / 0010 0000 0000(2) = 0100 1001(2) / 0010 0000 0000(2)
Convert the binary number to decimal. 0100 1001(2) / 0010 0000 0000(2) = (64 + 8 + 1) / 512 = 73 / 512

