import * as cdk from 'aws-cdk-lib';
import * as ec2 from 'aws-cdk-lib/aws-ec2';
export interface RockyLinuxStackProps extends cdk.StackProps {
}
export class RockyLinuxStack extends cdk.Stack {
public constructor(scope: cdk.App, id: string, props: RockyLinuxStackProps = {}) {
super(scope, id, props);
const ec2dhcpOptions = new ec2.CfnDHCPOptions(this, 'EC2DHCPOptions', {
domainName: 'ap-south-1.compute.internal',
domainNameServers: [
'AmazonProvidedDNS',
],
],
});
ec2dhcpOptions.cfnOptions.deletionPolicy = cdk.CfnDeletionPolicy.DELETE;
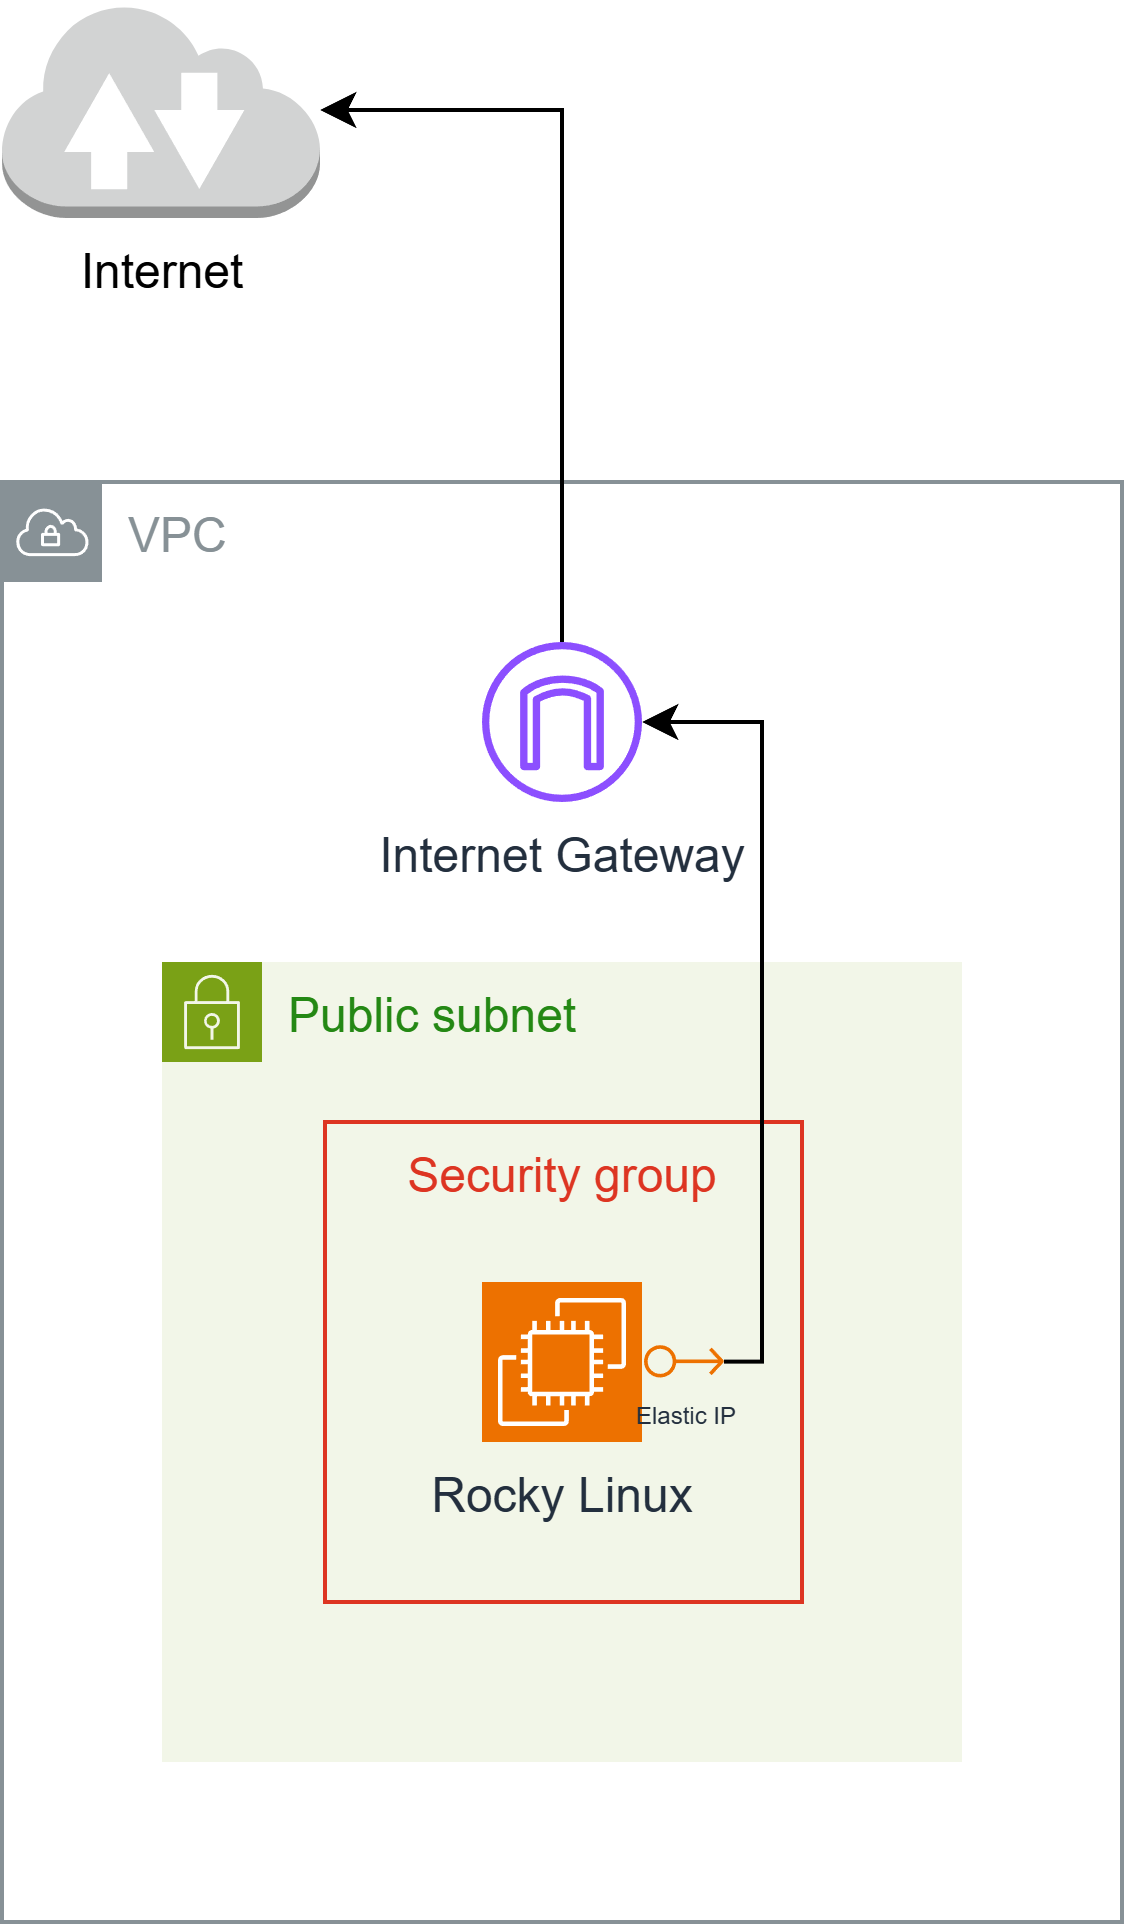
const ec2InternetGateway = new ec2.CfnInternetGateway(this, 'EC2InternetGateway', {
{
value: 'igw',
key: 'Name',
},
],
});
ec2InternetGateway.cfnOptions.deletionPolicy = cdk.CfnDeletionPolicy.DELETE;
const ec2vpc = new ec2.CfnVPC(this, 'EC2VPC', {
cidrBlock: '10.0.0.0/16',
enableDnsSupport: true,
instanceTenancy: 'default',
enableDnsHostnames: true,
{
value: 'vpc',
key: 'Name',
},
],
});
ec2vpc.cfnOptions.deletionPolicy = cdk.CfnDeletionPolicy.DELETE;
const ec2VPCGatewayAttachment = new ec2.CfnVPCGatewayAttachment(this, 'EC2VPCGatewayAttachment', {
vpcId: ec2vpc.ref,
internetGatewayId: ec2InternetGateway.ref,
});
ec2VPCGatewayAttachment.cfnOptions.deletionPolicy = cdk.CfnDeletionPolicy.DELETE;
const ec2NetworkAcl = new ec2.CfnNetworkAcl(this, 'EC2NetworkAcl', {
vpcId: ec2vpc.ref,
],
});
ec2NetworkAcl.cfnOptions.deletionPolicy = cdk.CfnDeletionPolicy.DELETE;
const ec2RouteTable = new ec2.CfnRouteTable(this, 'EC2RouteTable', {
vpcId: ec2vpc.ref,
});
ec2RouteTable.cfnOptions.deletionPolicy = cdk.CfnDeletionPolicy.DELETE;
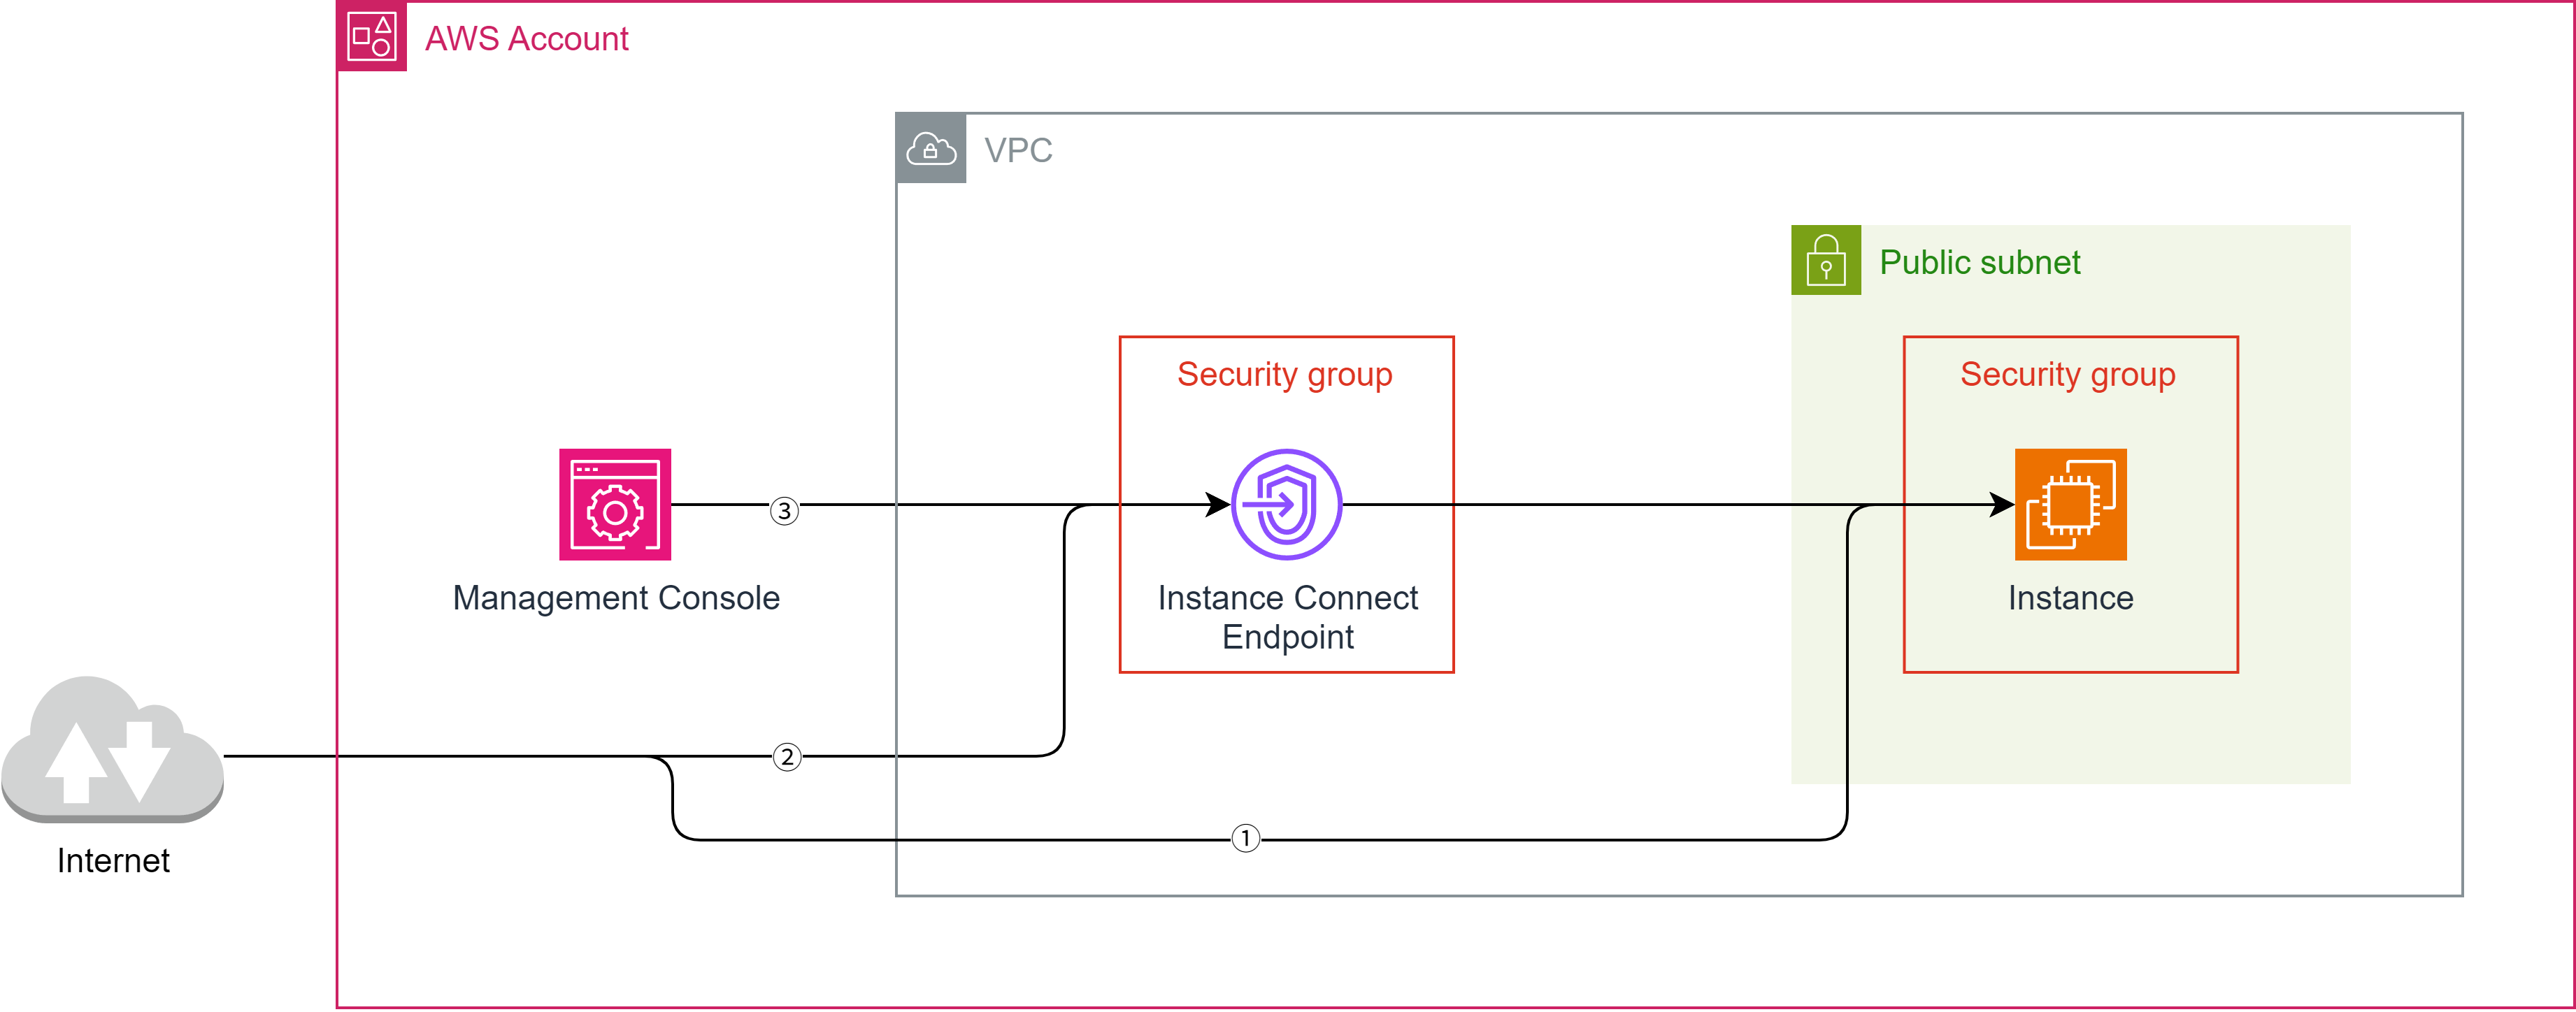
const ec2SecurityGroup = new ec2.CfnSecurityGroup(this, 'EC2SecurityGroup', {
groupDescription: 'launch-wizard-1 created 2025-04-27T00:11:58.641Z',
groupName: 'launch-wizard-1',
vpcId: ec2vpc.ref,
securityGroupIngress: [
{
cidrIp: '0.0.0.0/0',
ipProtocol: 'tcp',
fromPort: 22,
toPort: 22,
},
{
cidrIp: '0.0.0.0/0',
ipProtocol: 'icmp',
fromPort: 8,
toPort: -1,
},
],
securityGroupEgress: [
{
cidrIp: '0.0.0.0/0',
ipProtocol: '-1',
fromPort: -1,
toPort: -1,
},
],
});
ec2SecurityGroup.cfnOptions.deletionPolicy = cdk.CfnDeletionPolicy.DELETE;
const ec2Subnet = new ec2.CfnSubnet(this, 'EC2Subnet', {
vpcId: ec2vpc.ref,
mapPublicIpOnLaunch: false,
enableDns64: false,
availabilityZoneId: 'aps1-az1',
privateDnsNameOptionsOnLaunch: {
EnableResourceNameDnsARecord: false,
HostnameType: 'ip-name',
EnableResourceNameDnsAAAARecord: false,
},
cidrBlock: '10.0.0.0/20',
ipv6Native: false,
{
value: 'subnet-public1-ap-south-1a',
key: 'Name',
},
],
});
ec2Subnet.cfnOptions.deletionPolicy = cdk.CfnDeletionPolicy.DELETE;
const ec2InstanceConnectEndpoint = new ec2.CfnInstanceConnectEndpoint(this, 'EC2InstanceConnectEndpoint', {
preserveClientIp: false,
securityGroupIds: [
ec2SecurityGroup.attrGroupId,
],
subnetId: ec2Subnet.attrSubnetId,
});
ec2InstanceConnectEndpoint.cfnOptions.deletionPolicy = cdk.CfnDeletionPolicy.DELETE;
const ec2vpcdhcpOptionsAssociation = new ec2.CfnVPCDHCPOptionsAssociation(this, 'EC2VPCDHCPOptionsAssociation', {
vpcId: ec2vpc.ref,
dhcpOptionsId: ec2dhcpOptions.ref,
});
ec2vpcdhcpOptionsAssociation.cfnOptions.deletionPolicy = cdk.CfnDeletionPolicy.DELETE;
const ec2RouteHg = new ec2.CfnRoute(this, 'EC2RouteHG', {
routeTableId: ec2RouteTable.ref,
destinationCidrBlock: '0.0.0.0/0',
gatewayId: ec2InternetGateway.ref,
});
ec2RouteHg.cfnOptions.deletionPolicy = cdk.CfnDeletionPolicy.DELETE;
const ec2SubnetNetworkAclAssociation = new ec2.CfnSubnetNetworkAclAssociation(this, 'EC2SubnetNetworkAclAssociation', {
networkAclId: ec2NetworkAcl.ref,
subnetId: ec2Subnet.ref,
});
ec2SubnetNetworkAclAssociation.cfnOptions.deletionPolicy = cdk.CfnDeletionPolicy.DELETE;
const ec2SubnetRouteTableAssociation = new ec2.CfnSubnetRouteTableAssociation(this, 'EC2SubnetRouteTableAssociation', {
routeTableId: ec2RouteTable.ref,
subnetId: ec2Subnet.ref,
});
ec2SubnetRouteTableAssociation.cfnOptions.deletionPolicy = cdk.CfnDeletionPolicy.DELETE;
const ec2Instance = new ec2.CfnInstance(this, 'EC2Instance', {
tenancy: 'default',
instanceInitiatedShutdownBehavior: 'stop',
cpuOptions: {
threadsPerCore: 1,
coreCount: 2,
},
blockDeviceMappings: [
{
ebs: {
volumeType: 'gp3',
iops: 3000,
volumeSize: 10,
encrypted: false,
deleteOnTermination: true,
},
deviceName: '/dev/sda1',
},
],
availabilityZone: 'ap-south-1a',
privateDnsNameOptions: {
enableResourceNameDnsARecord: false,
hostnameType: 'ip-name',
enableResourceNameDnsAaaaRecord: false,
},
ebsOptimized: true,
disableApiTermination: false,
keyName: 'hikari',
sourceDestCheck: true,
placementGroupName: '',
networkInterfaces: [
{
privateIpAddresses: [
{
privateIpAddress: '10.0.3.59',
primary: true,
},
],
secondaryPrivateIpAddressCount: 0,
deviceIndex: '0',
groupSet: [
ec2SecurityGroup.ref,
],
ipv6Addresses: [
],
subnetId: ec2Subnet.ref,
associatePublicIpAddress: true,
deleteOnTermination: true,
},
],
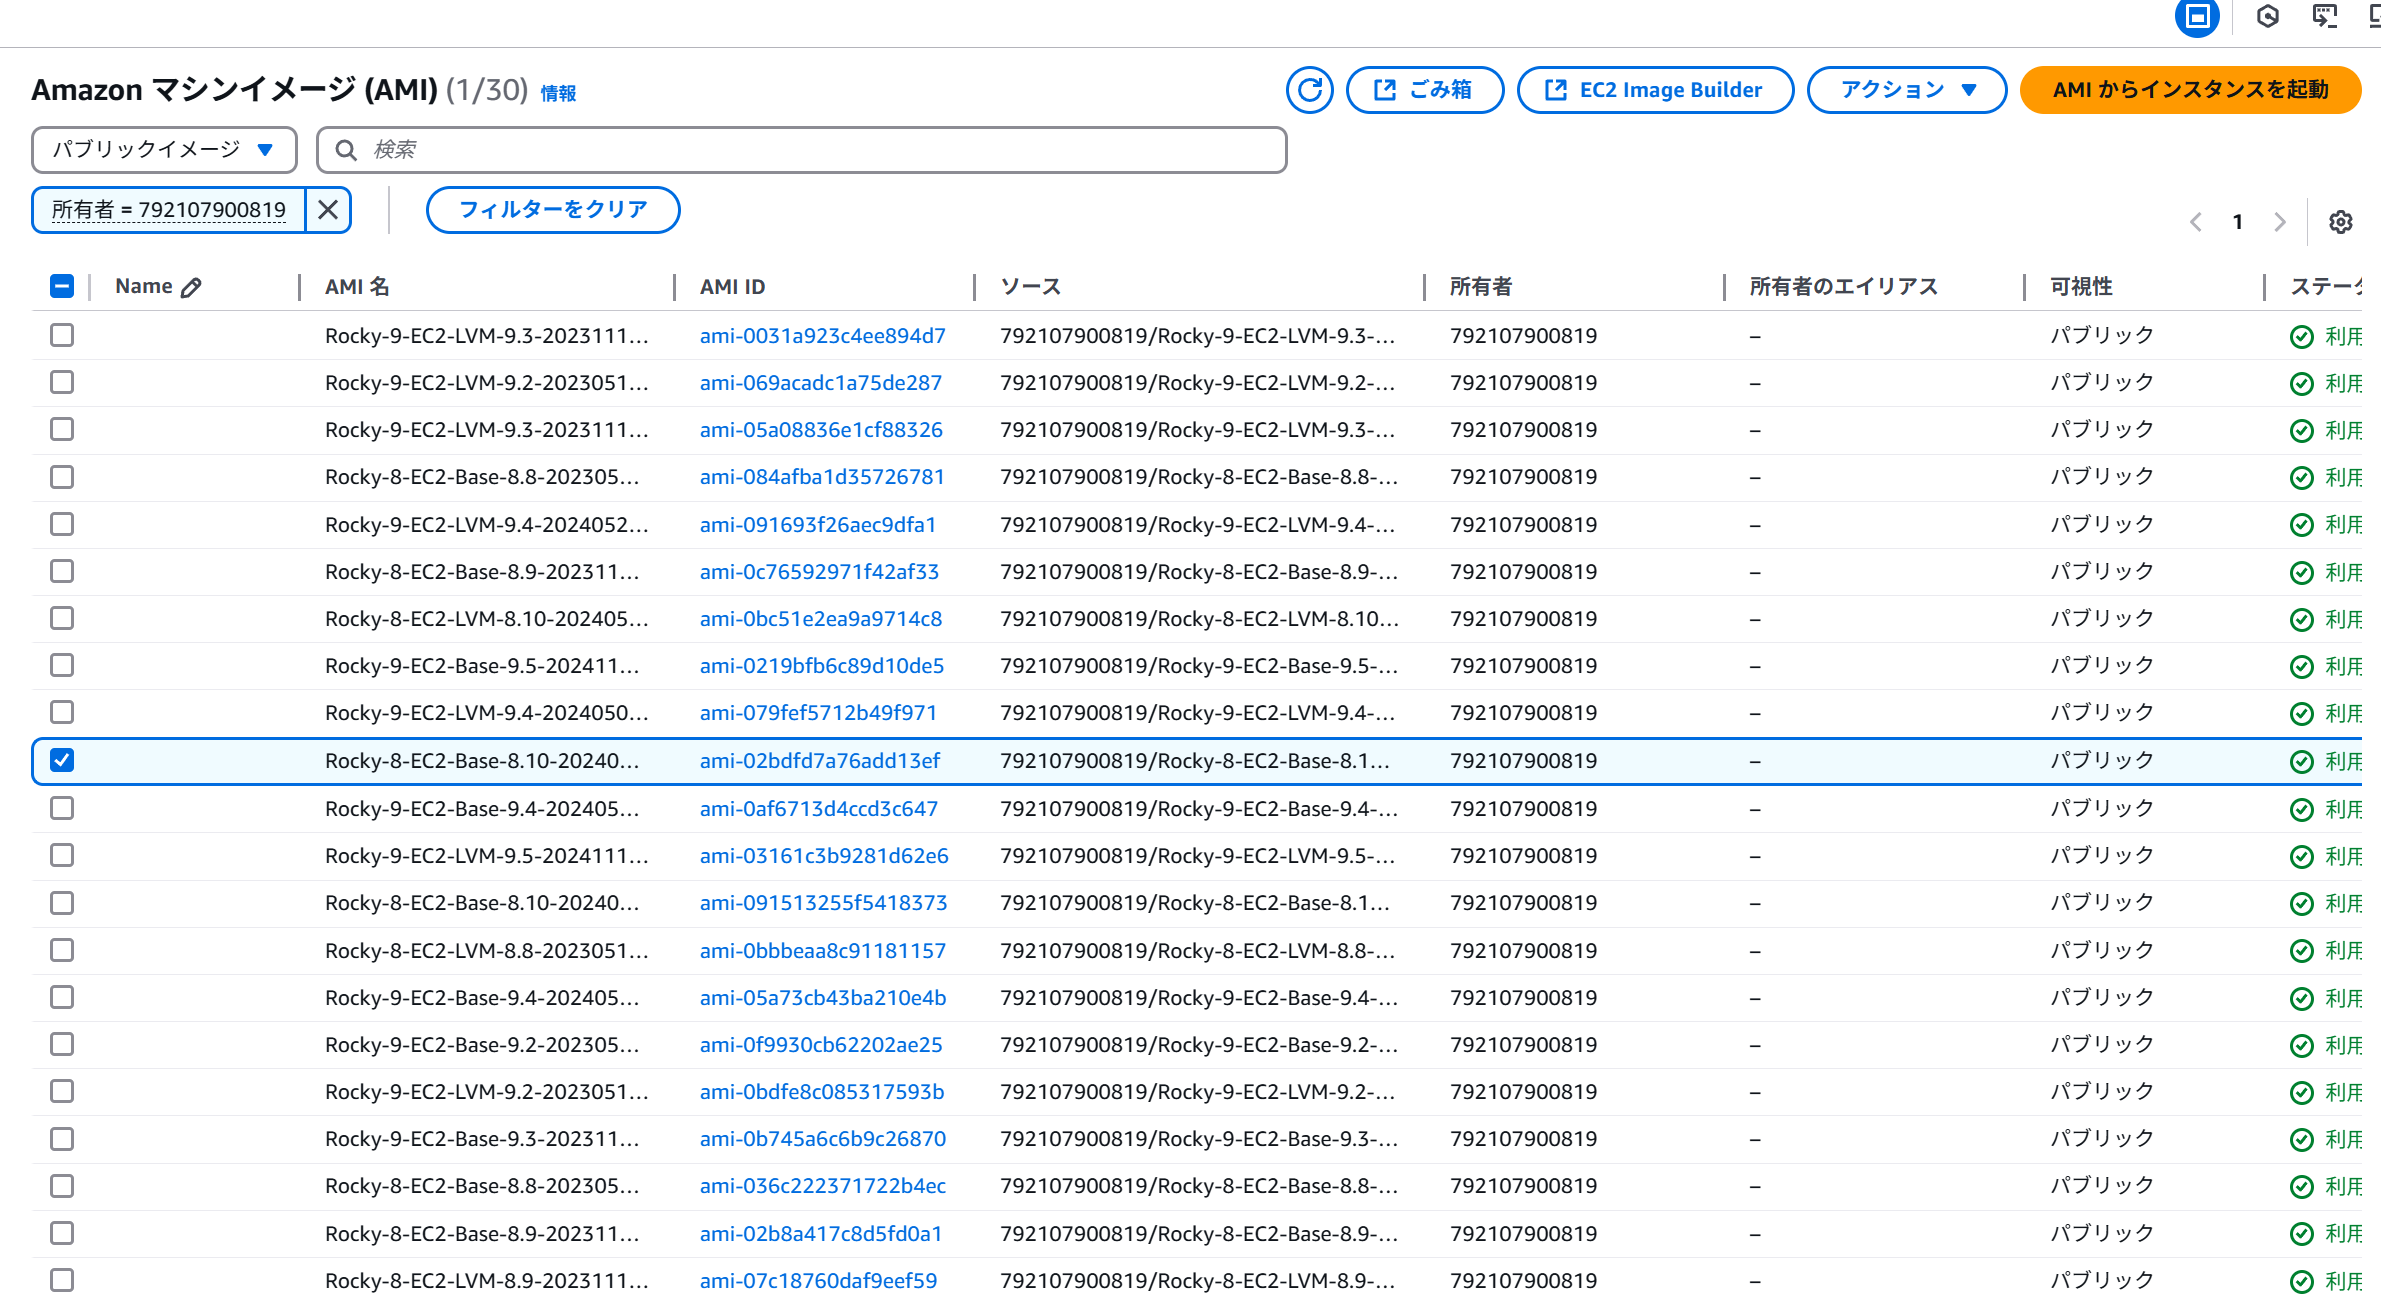
imageId: 'ami-0415efd8380284dc4',
instanceType: 't4g.medium',
monitoring: false,
],
creditSpecification: {
cpuCredits: 'unlimited',
},
});
ec2Instance.cfnOptions.deletionPolicy = cdk.CfnDeletionPolicy.DELETE;
const ec2ElasticIp = new ec2.CfnEIP(this, 'EC2ElasticIp', {
domain: 'vpc',
{
key: 'Name',
value: 'elastic-ip',
},
],
});
ec2ElasticIp.cfnOptions.deletionPolicy = cdk.CfnDeletionPolicy.DELETE;
const ec2EipAssociation = new ec2.CfnEIPAssociation(this, 'EC2EipAssociation', {
eip: ec2ElasticIp.ref,
instanceId: ec2Instance.ref,
});
ec2EipAssociation.cfnOptions.deletionPolicy = cdk.CfnDeletionPolicy.DELETE;
}
}