Building a Blog Comment API with AWS Serverless
I wanted to add a comment section to this blog, so instead of using an off-the-shelf solution like Disqus or giscus, I built my own API on AWS serverless. Here's a look at the design and implementation.
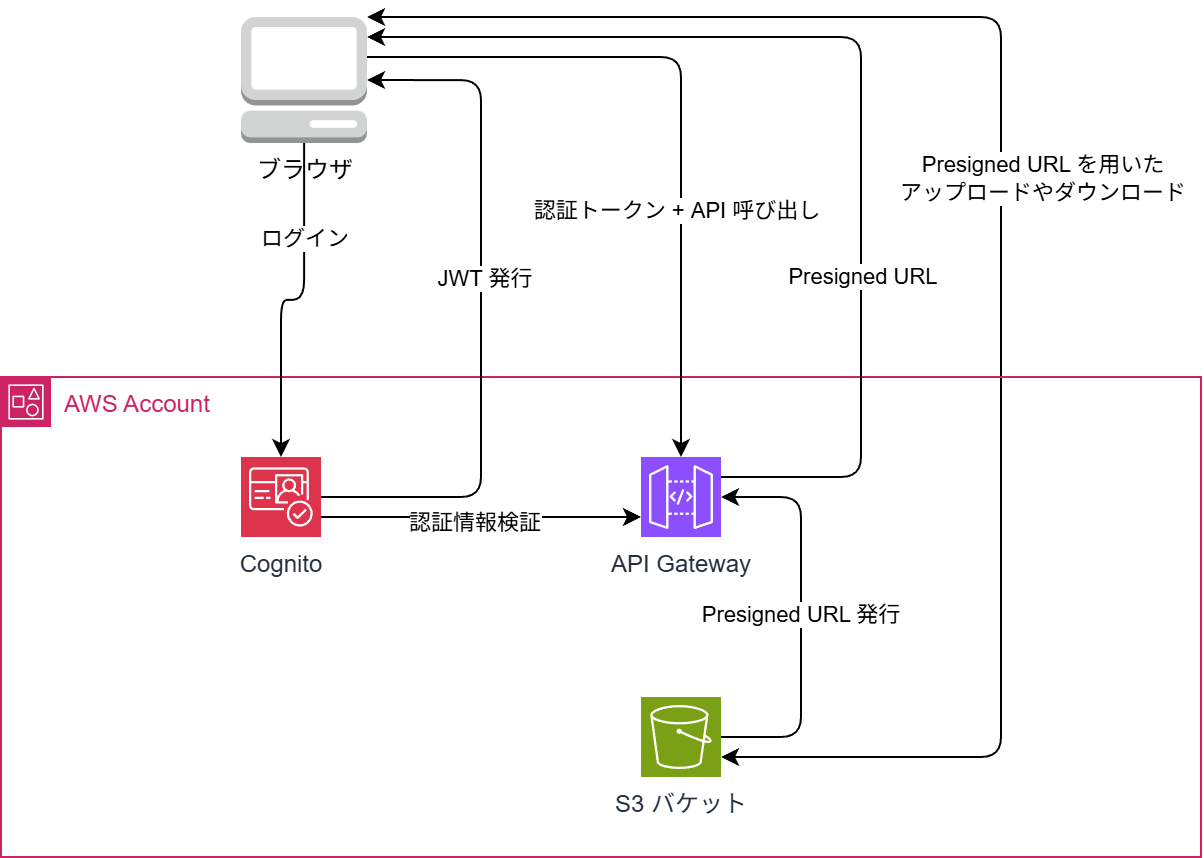
Architecture
Requests flow through the following stack:
Browser (www.hikari-dev.com)
  ↓ HTTPS
API Gateway
  ├── GET  /comment?postId=...    → Fetch comments
  ├── POST /comment               → Submit a comment
  └── PATCH /comment/{id}         → Admin (toggle visibility)
  ↓
Lambda (Node.js 20 / arm64)
  ↓
DynamoDB (comment storage)
  + SES v2 (admin email notifications)
The code is written in TypeScript and managed as IaC with SAM (Serverless Application Model). Lambda runs on arm64 (Graviton2) to shave a bit off the cost.
DynamoDB Table Design
The table is named blog-comments, with postId as the partition key and commentId as the sort key.
| Key | Type | Description |
|---|---|---|
postId | String | Post identifier (e.g. /blog/2026/03/20/hime) |
commentId | String | ULID (lexicographically sortable by time) |
Using ULID for the sort key means comments retrieved with QueryCommand are automatically returned in chronological order — which is why I chose ULID over UUID.
Spam Filtering
Before writing a comment to DynamoDB, the handler checks it against a keyword list defined in keywords.json.
If a keyword matches, the comment is saved with isHidden: true and isFlagged: "1", hiding it automatically. If nothing matches, it goes live immediately.
isFlagged is used as the key for a Sparse GSI. Comments that pass the filter don't get this attribute at all, which keeps unnecessary partitions from appearing in the index — good for both cost and efficiency. This is achieved simply by setting removeUndefinedValues: true on the DynamoDB Document Client.
export const ddb = DynamoDBDocumentClient.from(client, {
  marshallOptions: {
    removeUndefinedValues: true,
  },
});
Admin Email Notifications
Every time a comment is submitted, SES v2 sends me an email containing the author name, body, rating, IP address, and flag status.
The email is sent asynchronously, and any failure is silently swallowed. This keeps the POST response time unaffected by email delivery.
sendCommentNotification(record).catch((err) => {
  console.error("sendCommentNotification error:", err);
});
Privacy
IP addresses and User-Agent strings are stored in DynamoDB for moderation purposes, but they are never included in GET responses. This separation is enforced at the type level.
Security
| Layer | Measure |
|---|---|
| Network | AWS WAF rate limit: 100 req / 5 min / IP |
| CORS | Restricted to https://www.hikari-dev.com |
| Admin API | API Gateway API key auth (X-Api-Key header) |
| Spam | Keyword filter with automatic hiding |
For the admin endpoint (PATCH /comment/{id}), setting ApiKeyRequired: true in the SAM template is all it takes to enable API key authentication — no need to implement a custom Lambda Authorizer.
Wrap-up
The serverless setup means no server management, and DynamoDB's on-demand billing keeps costs minimal for a low-traffic personal blog.
The whole thing is packaged with SAM + TypeScript + esbuild, and deploying is as simple as sam build && sam deploy.